Creating Dynamic UI
🎮 GDC: Park Clean-Up Game
Although the UI Toolkit is designed primarily for C# developers, it can also be integrated with Visual Scripting, allowing for dynamic UI updates without extensive coding. In this tutorial section we will walk through the workflow of using the UI Toolkit with Visual Scripts as well as identify some limitations.
UI Elements with Visual Scripting
By default, Unity's Visual Scripting package does not load all possible Nodes. This reduces the size of the package especially since there are a great many Nodes that you may not use in your project. HOwever, in our case we will need to load the Nodes specifically for use with the UI Toolkit.
🛠 Importing UI Nodes
Tutorial: UI Nodes
📝UI ToolKit | 🕒15 minutes | 📂Required File: Park Clean-Up Game
In this tutorial we will import the required Nodes for using UI elements with Visual Scripting.
Step 1: Update the Type Options
- In the Unity Editor select
Edit > Project Settings > Visual Scripting - From the Visual Scripting dialog, click on the
Type Optionsto expand. - At the bottom of the Type Options list, click the
+button and add each of the following UI Toolkit elements:- U Query Extension
- Visual Element
- Label
- Button
- Then press the
Regenerate Notesbutton to import and save the type list.
Modular Design
Now that we have imported the necessary UI Toolkit types, we can begin scripting the HUD (Heads-Up Display) using Visual Scripting. However, before we build the HUD, we need to think about Modular Design and how it should be implemented in our scripts.
Modularity is the practice of designing systems that can be reused in different contexts. For instance, in this tutorial, we will track the player's collected amount. While the current goal is to track trash bags in the Park Clean-Up Game, this same HUD system could later track cans for recycling, keys for unlocking doors, or any other collectible. By focusing on generalized logic, such as a "collected amount", we can design a flexible system that avoids unnecessary duplication of code.
This modular approach mirrors the abstraction seen in algebra, where unknown values are represented by symbols like X. As long as we pass the correct data, the same system can adapt to different gameplay objectives.
🛠 Scripting the HUD
Tutorial: Scripting the HUD
📝UI ToolKit | 🕒15 minutes | 📂Required File: Park Clean-Up Game
In this tutorial we create events for updating the HUD.
Step 1: Adding a Script Machine
- Open the ParkScene in the Unity Editor
- Select the
HUDGameObject in the Hierarchy window - Add a Script Machine in the Inspector Window
- Click
Add Componentand search forScript Machine. - In the
Script Machinecomponent, clickNewto create a new Script Graph. - Name the graph HUD and save it in your Scripts folder.
- Click
Step 2: Collection Variables
-
Open the Script Graph
- In the Inspector, locate the
Script Machinecomponent. - Click
Edit Graphto open the visual scripting editor.
- In the Inspector, locate the
-
Set Graph Variables
- In the Blackboard of the Script Graph add the following variables:
- collectedAmount - integer
- requiredAmount - integer
- In the Blackboard of the Script Graph add the following variables:
Event Arguments
As mentioned earlier our UI does not need to know if we are collecting trash or cans or whatever, but it does need to know thous values. Unity Visual Scripting allows us to pass this data as arguments through the custom events we define. Understanding how to work with arguments in events is crucial for creating flexible systems that can respond to different gameplay scenarios.
What is an Argument? An argument in programming refers to the value or data that is passed into a function, method, or event when it is called. In Unity Visual Scripting, arguments are simply the pieces of information (like numbers or strings) that get sent from one part of your game to another. These arguments allow different parts of your game (like the Trash Bin and HUD) to communicate without needing to know about each other’s specific implementation details.
In our case, we are passing two values—the collected amount (the amount the player has collected) and the required amount (the amount the player needs to collect). The important thing to note here is that these values are passed by the Trash Bin to the HUD without the HUD needing to know that the values are related to trash. The system is flexible, so the same concept can be used for any other collectible items, such as keys or cans.
Step 3: Passing Arguments
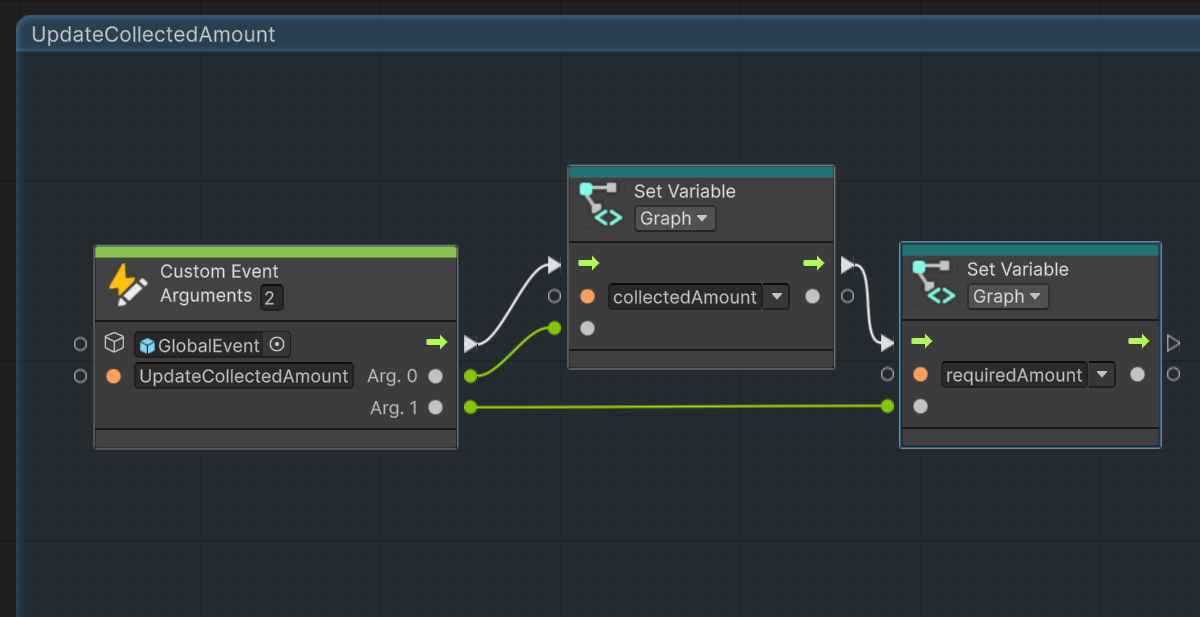
-
Update Collection Event
- Create a new
Custom Eventand name itUpdateCollectedAmount.- Set the target to Global Event
- Set the Arguments to 2
- Create a new
-
Set Graph Variables
- Add a
Set Graph Variablenode to assign the collectedAmount - Set the
Arg 0as the value for the collectedAmount - Flow the
UpdateCollectedAmountinto theSet Graph Vairablenode - Add another a
Set Graph Variablenode to assign the requiredAmount - Set the
Arg 1as the value for the requiredAmount - Flow the collectedAmount
Set Graph Variablenode into the requiredAmountSet Graph Variablenode
- Add a
The image below displays how the event should appear in the script graph.
Accessing UI Elements
In order to access UI elements in, whether in code or through visual script we need to first reference the UI Document in which the elements are on.
Once we have the UI Document we will need to get the root VisualElement of the UI Document. The root VisualElement serves as the parent for all other UI elements, like buttons, text fields, and images. Once we have access to the root element, we can then search for specific child elements by their name or type.
The process for accessing UI Elements follows this flow:
-
Access the UI Document:
- The UI Document is the asset that holds your entire UI structure. To interact with the UI, we must reference this document from the Visual Script.
-
Get the Root VisualElement:
- The root VisualElement is the container that holds all other UI elements. By using the Get Root VisualElement node, you can retrieve this parent element and start accessing the child elements inside it.
-
Query the Element Name:
- Once you have the root VisualElement, you can use the Query node or the Get VisualElement by Name node to access specific elements by their name. The name of an element is assigned when you set up the UI in the UI Builder.
In Visual Scripting, these nodes allow you to programmatically access UI elements and update them dynamically, such as changing text or adjusting visibility. By referencing UI elements through their names, you maintain flexibility and scalability in your UI logic.
This approach keeps your UI system organized and modular, as you can update or reference elements without needing to directly manipulate their position in the UI hierarchy, making it easy to adapt to changes or expand the interface.
Step 4: Accessing UI Elements
-
Get the Root Visual Element:
- Add the
UI Document Get Root Visual Elementnode.- Set the Target to This (since the UI Document is on the
HUDgame object).
- Set the Target to This (since the UI Document is on the
- Add the
-
Find the Visual Element:
- Add the
Visual Element Q (Name, Class Name)node.- Set the Name of the element to the name of the Text Label in the UI document you want to update. For example, if your text label is named
Counter Text, set the name toCounter Text. - Connect the flow from the
UI Document Get Root Visual Elementnode to the Target of theVisual Element Qnode.
- Set the Name of the element to the name of the Text Label in the UI document you want to update. For example, if your text label is named
- Add the
-
Set Collected and Required Amounts:
- Flow the last
Set Graph Variablenode (for the requiredAmount) into theVisual Element Qnode.
- Flow the last
-
Concatenate the String for Display:
- Add a
String Concatnode to combine the collected and required amounts into a message.- Pass in Get Variable nodes for both the collectedAmount and requiredAmount as inputs to the
String Concatnode. - Add a String Literal node to format the text (e.g.,
"Collected: "and" / Required: ").
- Pass in Get Variable nodes for both the collectedAmount and requiredAmount as inputs to the
- Add a
-
Set the Text of the Label:
- Add a
Label Set Textnode to display the concatenated message.- Set the Target of the
Label Set Textnode to the result of theVisual Element Qnode (the text label element). - Connect the output of the
String Concatnode into the Text input of theLabel Set Textnode.
- Set the Target of the
- Add a
The final UpdateCollectedAmount event should look like the image below.
Triggering a UI Update
While we've created a custom event to update the UI, we have yet to set any triggers to call this event.
For the first mission, the Trash Bins hold the values for both the collected and required amounts of trash — these are the values we’ll display in the UI.
To ensure the UI shows the correct values:
- The Trash Bin should call this method in the
Startmethod to initialize the default values. - Additionally, the method should be called whenever the collected amount changes, which occurs during the
AddToCounterevent.
🛠 Updating the UI
Tutorial: UI Updatess
📝UI ToolKit | 🕒15 minutes | 📂Required File: Park Clean-Up Game
In this tutorial we will set up triggers to call the event to update the UI.
Step 1: Start Trigger
- Open the Script Graph
- Select the TrashBin Visual Script from the
Assets > Scriptsfolder in the Inspector - Double-click on script to open it in the Visual Script Editor.
- Select the TrashBin Visual Script from the
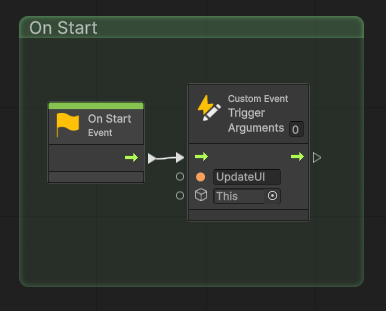
- Add an On Start Event
- In the graph editor add an
On Startevent node - Flow the
On Startnode into aCustom Event Trigger
- In the graph editor add an
- Set the Custom Event Trigger
- Set the name of the Event to UpdateUI
- Set the target to This
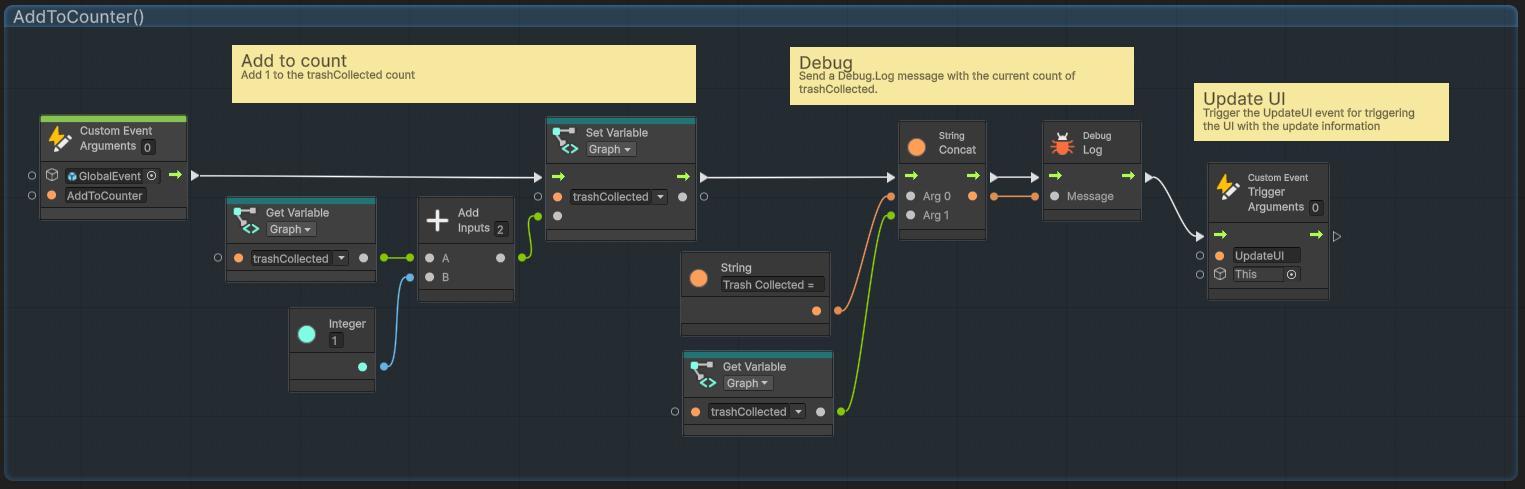
Step 2: Add to Counter Trigger
- Update the AddToCounter Event
- Locate the
AddToCounterevent - At the end of the event after the
Debug Logadd aCustom Event Trigger
- Locate the
- Set the Custom Event Trigger
- Set the name of the Event to UpdateUI
- Set the target to This
Applying Dry Principle
In programming, the DRY principle, short for Don't Repeat Yourself, emphasizes the importance of avoiding duplication of logic in multiple places.
While we could simply call the UpdateCollectedAmount method in the Start method and pass the required arguments, we would need to repeat this call in the AddToCounter event as well.
Though passing the two arguments may not seem like much, there's a risk of accidentally passing the wrong value in one of the method calls, which could result in hours of troubleshooting as you search for where the incorrect value is coming from.
Additionally, if we ever need to change the name of the variables being passed, we'd have to update that change across every location where those variables are referenced.
By creating a single UpdateUI method that calls UpdateCollectedAmount and passes the arguments, we centralize this logic in one place. This reduces the potential for errors, as both the arguments and the method call are handled in a single location, simplifying future updates and minimizing the risk of mistakes.
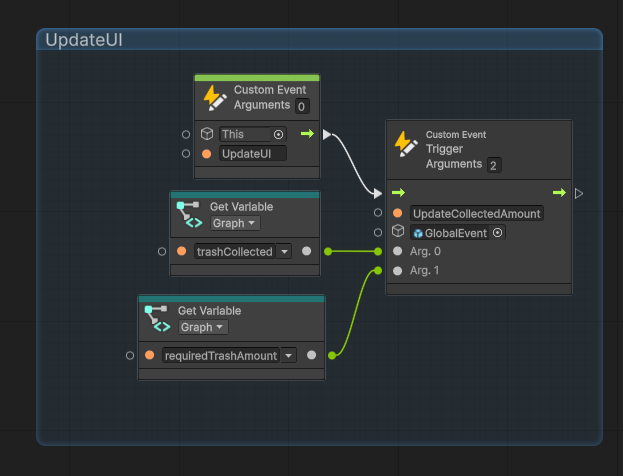
Step 3: Create the UpdateUI Event
-
Add Custom Event
- Set the name of the Event to UpdateUI
- Set the target to This
-
Add Custom Trigger Event
- From the
Custom Eventnode flow into aCustom Event Trigger - Set the name of the Event to UpdateCollectedAmount
- Set the Target to
GlobalEvent - Set the amount of argments to 2
- From the
-
Pass Arguments
- Add a
Get Graph Variablenode for trashCollected - Add a
Get Graph Variablenode for requiredTrashAmount - Set the trashCollected node for the value of Arg 0
- Set the requiredTrashAmount node for the value of Arg 1
- Add a
- Testing
- Save the Script Graph and exit the Script editor
- Return to the ParkScene
- Press Play to test the scene
- Interact and collect trash
- As the trash is collected the values on the UI should update.