Unity Input System

In this tutorial, you'll learn how to set up Unity's Input System to handle multiple input bindings for controlling game objects. We will cover the process of creating input actions, binding them to controls, and utilizing them within a C# script to drive game object movement. Additionally, we'll demonstrate how to add support for both mouse and touch input, making your game more flexible across devices.
🛠 Setup the New Input System
Tutorial: New Input System
📝Game Design | 🕒5 minutes | 📂Required File: None
In this tutorial sets up input handling using Unity using the Input System package..
Input Actions
-
Install the Input System Package:
- Open Unity Package Manager Window > Package Manager.
- Search for the Input System package and install it.
- After installation, Unity will prompt you to restart and enable the new input system. Choose "Yes" to enable it. Unity will need to restart.
-
Set Up the Input Actions:
- Create a new Input Actions Asset by right-clicking in the Assets folder, selecting Create > Input Actions.
- Name the controls GameControls
- Double-click the newly created GameControls , Input Actions asset to open the Input Actions editor.
- Add a new Action Map, name PlayerControls
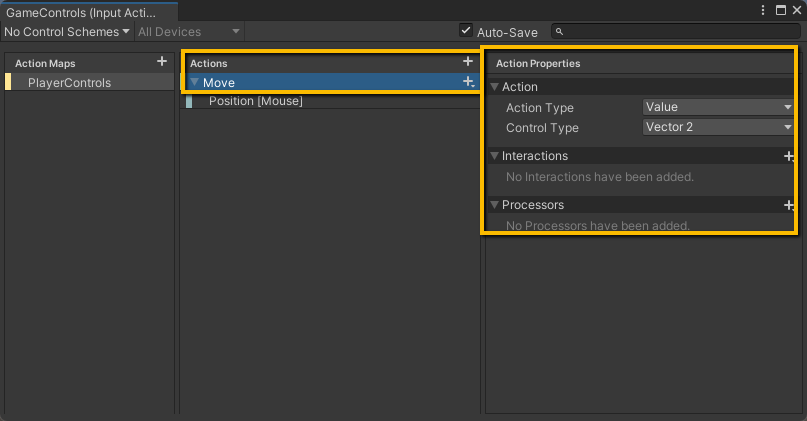
- Add a new Action, in the Actions Panel, named Move
- Change the Action Type to Value
- Set the Control Type to Vector2
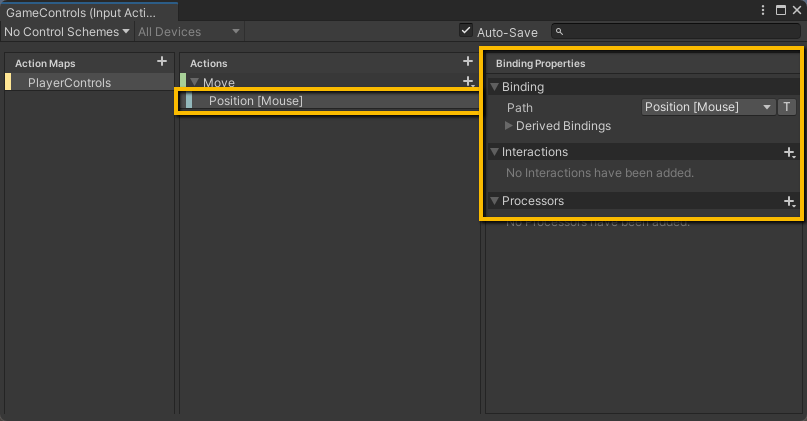
- Add a binding to the action
- Choose add a Mouse > Position
- Create a new Input Actions Asset by right-clicking in the Assets folder, selecting Create > Input Actions.
 Fig 1. Setup the Move action to record a Vector2 value
 Fig 2. Add a Mouse Position binding to the Move action
In Unity’s new Input System, methods bound to Input Actions follow a specific naming convention for automatic calling. The method names must match the format On<ActionName> where <ActionName> is the name of the action defined in your Input Action asset.
- Add Player Input:
- Select the prefab of the gameObject that will be controlled by the PlayerControls Action Map
- Add a Player Input Component
- Set the Actions to the GameControls Input Action asset
- Set the Default Map to PlayerControls
Defining Behaviors
- Create a C# Script:
- Create a new C# script named FollowX to control the game object's movement based on
InputValueof aVector2.- In this instance the
InputValueis binded to themouse position(see Actions setting above).
- In this instance the
- With the prefab of the gameObject that will be controlled, still selected add the FollowX script
- Open the FollowX script script in your IDE and use the following code:
- Create a new C# script named FollowX to control the game object's movement based on
using UnityEngine;
using UnityEngine.InputSystem; //access to Input System package classes

public class FollowX : MonoBehaviour
{
    //OnMove is called when the action value updates
    private void OnMove(InputValue movementValue)
    {
        Vector2 movementVector = movementValue.Get<Vector2>(); //get vector 2 input
        Vector3 worldPosition = ScreenToWorld(movementVector); //convert to worldPosition
        UpdateObjectPosition(worldPosition.x);
    }//end OnMove()

    private Vector3 ScreenToWorld(Vector2 screenPosition)
    {
        //Calculate vector 2 position to world position
        Vector3 worldPosition = Camera.main.ScreenToWorldPoint(new Vector3(screenPosition.x, screenPosition.y, -Camera.main.transform.position.z));
        return worldPosition;
    }//end ScreenToWorld()

    private void UpdateObjectPosition(float xPosition)
    {
        // Update only the x position of the game object
        Vector3 pos = transform.position;
        pos.x = xPosition;
        transform.position = pos;
    }//end UpdateObjectPosition()

}
In Unity's new Input System, InputValue is a reference call to the Input Device but rather than return the device name it is returning all values associated with the device. Using InputValue.Get() will returns the specific values depending on the action type (e.g., button press, vector movement, etc.).
In the example above the InputValue.Get<Vector2>() returns a Vector2 value of the InputValue (e.g. device such as a joystick movement or WASD keyboard input). This Vector2 represents the horizontal and vertical input axes and will return two float values:
- x: the horizontal axis
- y: the vertical axis
For example, if the player presses the "A" key (to move left), it would return Vector2(-1, 0), meaning left. If they press "W" (to move up), it might return Vector2(0, 1), meaning up.
- Playtest:
- Save your C# script and return to Unity editor
- Ensure that your prefab of the gameObject that is being controlled, is in the scene
- Press the Play button to playtest the game.
- Moving the mouse will should now move the game object in the X direction of the mouse.
If the game object is not moving, check the script to make sure that the On<ActionName> method has the name as the same <ActionName> of the action defined in your Input Action asset.
Add Other Bindings
- Add a Touch Binding:
- From the project panel double click to open the GameControls input asset.
- Select the PlayerControls ActionMap
- Select the Move Action
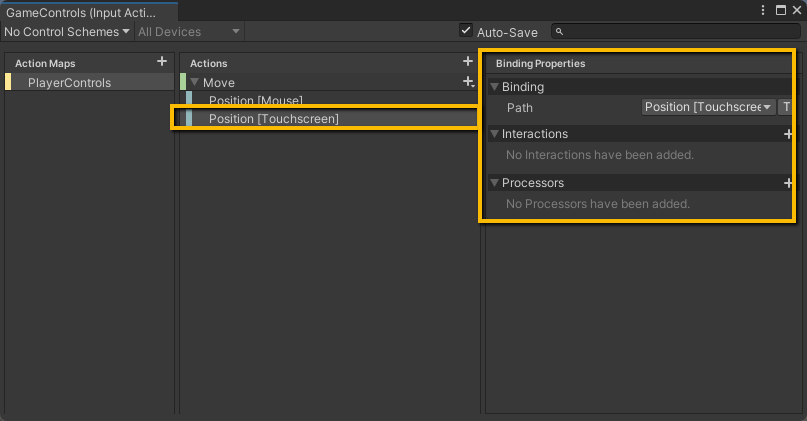
- Add a binding to the action
- Choose add a Touch > Position
 Fig 3. Add a Touch Position binding to the Move action
Testing Touch Inputs
In this section, we'll test the input system with touch controls using Unity Remote, allowing you to use your Android device as a touch controller during development. This is especially useful for prototyping and debugging on mobile devices without needing a full build.
🛠 Testing Inputs
Tutorial: Testing Inputs
📝Game Design | 🕒5 minutes | 📂Required File: None
In this tutorial sets up input handling using Unity using the Input System package..
-
Install Unity Remote
- Install Unity Remote from the Android Play store
-
Enable USB Debugging on your Android Device
-
- Go to Settings > About Phone > Scroll down to Build number and tap it 7 times to unlock Developer Options.
- Go back to Settings > System > Developer Options and toggle on USB Debugging.
-
Ensure File Transfer Mode is Set
- Connect the phone to the computer
- Ensure that File Transfer (or Transfer Files) mode is selected
-
Set Unity Remote Device
- In the Unity editor choose Edit > Project Settings > Editor
- Under Unity Remote set the Device to Any Android Device
-
Set Build Settings
- Select File > Build Settings
- Switch the platform to Android
-
Playtest:
- Open Unity Remote app on your phone
- In the Unity editor Press the Play button to playtest the game.
- The game will appear on the phone app
- Use your finger to move the game object in the X direction