🎮 Park Clean-up Game
In this project, we will continue developing Park Clean-Up, the casual puzzle/exploration game we previously introduced. Players take on the challenge of restoring a park by collecting and disposing of trash in designated bins.
In our previous chapter on visualizing game loops in flowcharts, we outlined the core gameplay loops for this project. These loops define how players interact with objects, clean up the environment, and unlock new areas by meeting objectives. Mapping out these interactions through flowcharts is a crucial step in the development process, providing a clear framework for implementing the game's mechanics, whether through visual scripting or traditional coding.
Trash Collection
The main game loop for the first level (area) consists of the player collecting a set number of trash bags and disposing of them in designated bins.
🛠 Trash Bag Interactions
Tutorial: Trash Bag Interactions
📝Visual scripting | 🕒15 minutes | 📂Required File: Park Clean-Up Game
In this tutorial we will set up the visual scripts for the trash bag interactions.
To begin, we’ll focus on the interaction between the player and the trash bags. The following actions should occur when a player picks up a trash bag:
- Increase the count of collected trash
- Play a sound effect
- Destroy the trash bag prefab
Since all trash bags will function the same way, we need to update the trash bag prefab to ensure consistent behavior across all instances.
Step 1: Prepare the Trash Bag Prefab
To set up the trash bag prefab for interaction, follow these steps:
-
Open the Trash Bag Prefab
- In the Hierarchy, locate a trash bag object in the Park Scene.
- Right-click the object and select
Prefab > Open Asset in Contextto edit the prefab directly.
-
Add a Box Collider (Trigger)
- With the trash bag prefab selected, go to the Inspector panel.
- Click
Add Componentand search forBox Collider. - Enable
Is Triggerto allow interaction without physical collision. - Set the size of the box collider to allow for easy interaction with the player and trash bag.
-
Add an Audio Source
- Click
Add Componentand search forAudio Source. - In the
Audio Sourcecomponent, uncheckPlay on Awakeso the sound only plays when triggered. - Set the
Loopto unchecked as this clip will only play once. - Click the
Audio Clipfield and assign the SX_collected-trash.wav sound file.
- Click
-
Add a Script Machine
- Click
Add Componentand search forScript Machine. - In the
Script Machinecomponent, clickNewto create a new Script Graph. - Name the graph TrashBag and save it in your Scripts folder.
- Click
The following is a screenshot of the trash bag prefab with the above setting applied
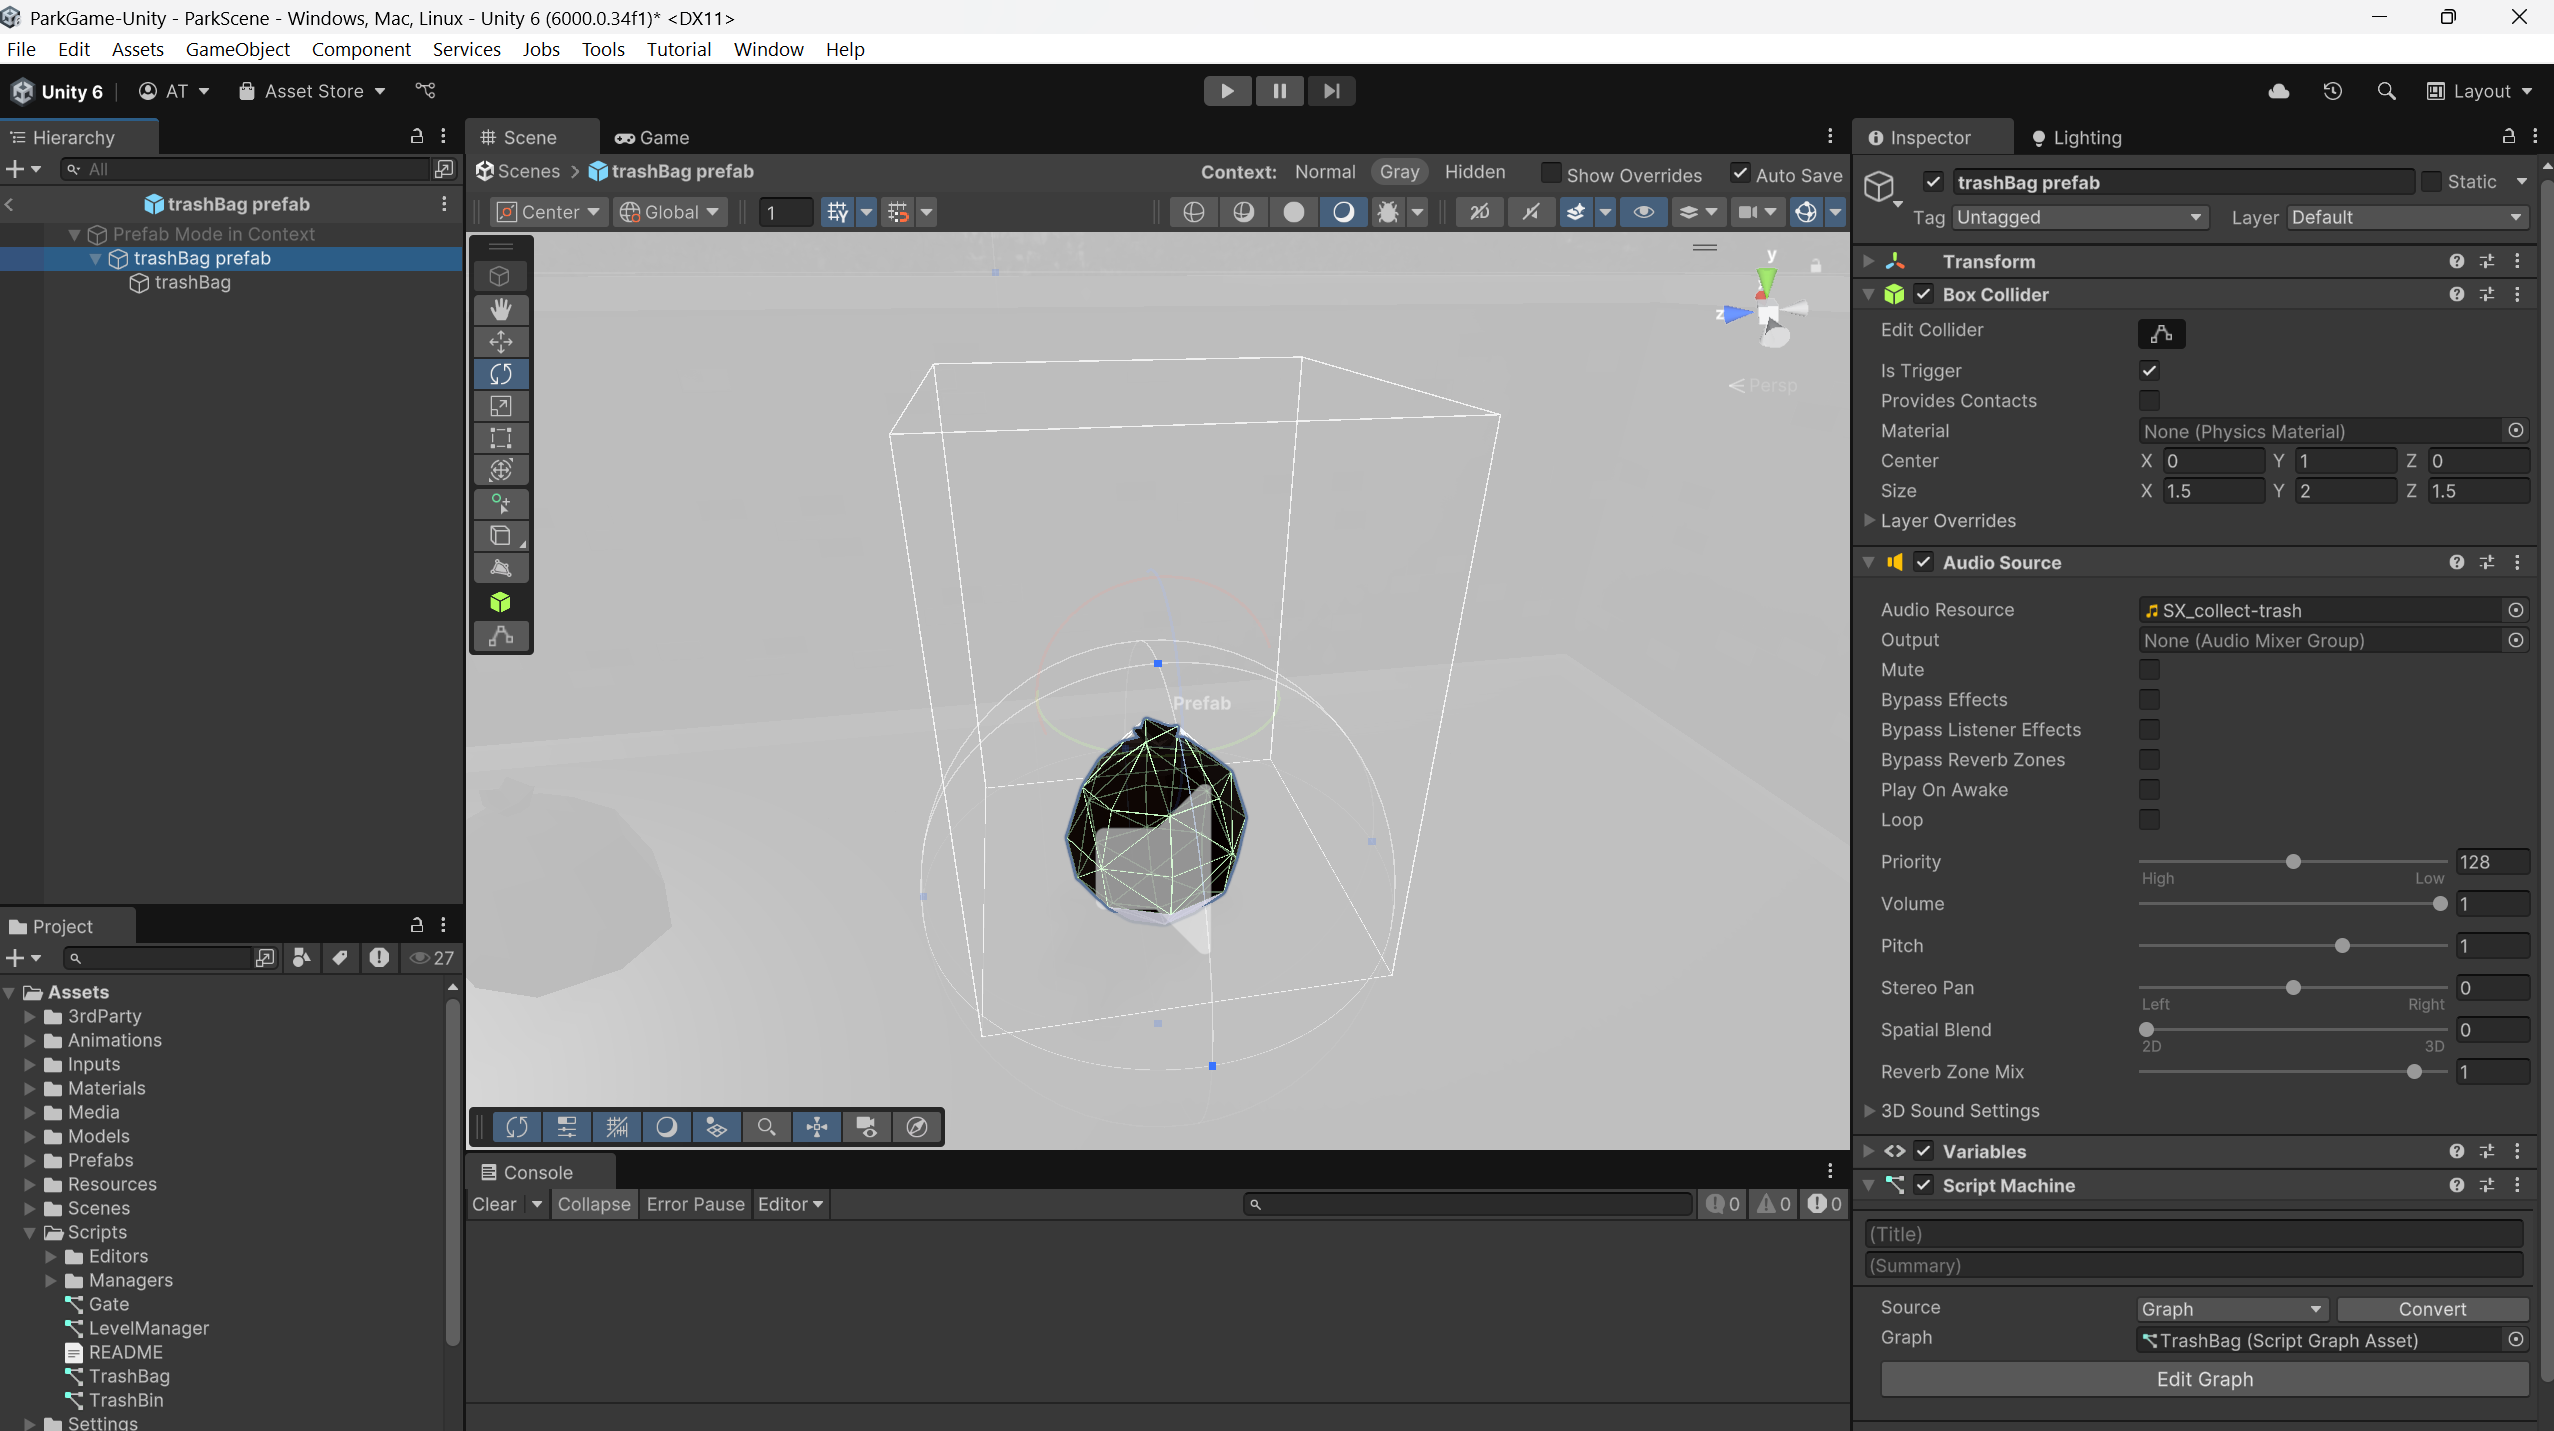
With these steps completed, the trash bag prefab is ready for scripting interactions.
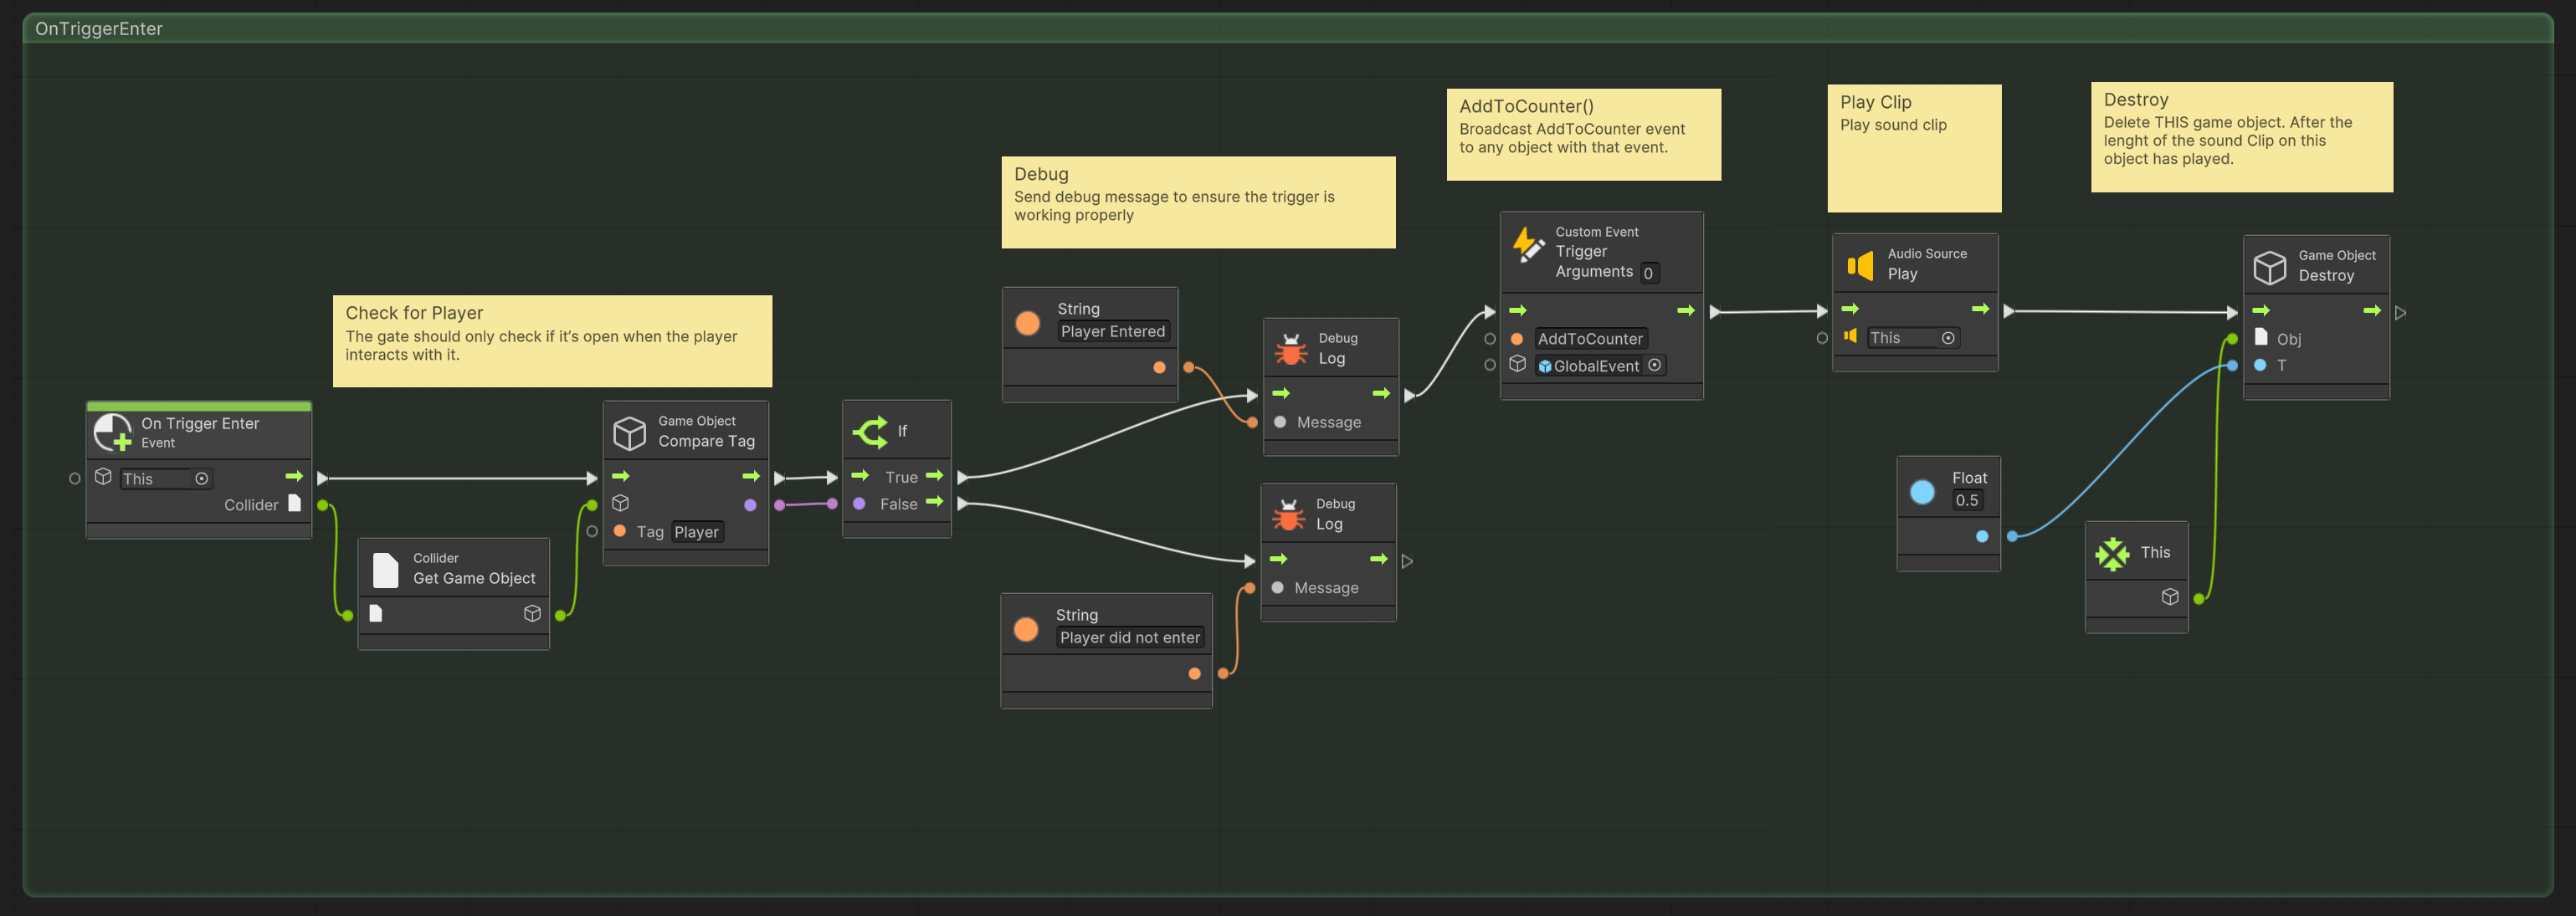
Step 2: Set Up OnTriggerEnter for Player Interaction
With the Trash Bag Prefab still open in Prefab Mode, follow these steps to set up the interaction logic:
-
Open the Script Graph
- In the Inspector, locate the
Script Machinecomponent. - Click
Edit Graphto open the visual scripting editor.
- In the Inspector, locate the
-
Remove Default Nodes
- In the script graph, delete the default
OnStartandOnUpdatenodes, as they are not needed for this interaction.
- In the script graph, delete the default
-
Add an OnTriggerEnter Node
- In the Graph Editor, right-click and search for
OnTriggerEnter. - This node will trigger when another object enters the trash bag's
Box Collider.
- In the Graph Editor, right-click and search for
-
Check If the Player Entered the Trigger
- Add a
Collider → Get Game Objectnode and connect it toOnTriggerEnter. - Add a
Game Object → Compare Tagnode and set the tag to Player. - Connect the
Get Game Objectnode to theCompare Tagnode.
- Add a
Before we get much further, we will test to make sure that the OnTriggerEnter event is even working. We can easily test this with a Debug Log message sent to the console.
-
Test the Condition with Debug Logs
- Add an
If(Branching Node) and connect theCompare Tagoutput. - Create a
Debug Lognode and a String Literal node. - Set the String Literal to
"Player Entered"and connect it to the True output of the If node. - Add a second Debug Log and String Literal, setting the message to
"Player did not Enter". - Connect this to the False output of the If node.
- Add an
-
Test the Interaction
- Save the graph and close the Script Graph window.
- Enter Play Mode in Unity and move the player toward a trash bag.
- Check the Console to verify the correct debug message appears when entering the trash bag's trigger.
Once the debug messages confirm the interaction is working, we can proceed to implementing the actual trash collection logic.
Step 3: Calling a Global Event
In object-oriented programming, there's a common design pattern called the observer pattern. This pattern allows one object (the subject) to send out a message, and multiple other objects (observers) can listen for and react to that message.
This approach prevents objects from being tightly connected to one another. For example, if Object A directly tells Object B what to do, Object A must know that Object B exists. If Object B is missing or changes, the interaction could break. Instead, Object A can simply send out a message, and any object listening for the message will respond accordingly.
Unity’s Visual Scripting doesn’t include a built-in observer system, but we can achieve similar behavior using Global Events. A Global Event acts like a shared broadcast station—any object can send an event, and any other object can listen for it without needing a direct connection.
In this section, we’ll set up a Global Event that lets our trash bag objects notify the game when they’ve been collected, so the game can update the counter on the trash bins without the trash bags needing to know about the trash bins directly.
-
Create the Global Event Object
- In the Hierarchy, create an Empty GameObject.
- Rename it to
GlobalEvent. - Drag
GlobalEventinto the Project Window to convert it into a Prefab. - Delete
GlobalEventfrom the scene (we only need the prefab).
-
Modify the Trash Bag Prefab
- Open the Trash Bag Prefab in Context.
- In the Inspector, locate the
Script Machinecomponent. - Click
Edit Graphto open the visual scripting editor.
-
Add a Custom Event Trigger
- Locate the
Debug Lognode connected to the True branch of theIfnode. - After this, add a
Custom Event Triggernode. - Set the Event Name to
AddToCounter. - Set the Target Object to the
GlobalEventprefab.
- Locate the
At this point, the event trigger has been set up, but nothing will happen until we configure the receiving event on the Trash Bin.
Step 4: Playing a Sound Clip
Next, we want to play the sound clip when the trash bag is interacted with.
- Flowing from the
Custom Event Triggernode, add anAudio Source Playnode. - Make sure that the target is set to
This. This ensures that the sound clip assigned to theAudio Sourcecomponent (in the inspector) will play.
Step 5: Destroying the Object
In Unity, calling the Destroy method immediately removes the object from the scene and stops any behaviors associated with it. This means that if the object is in the middle of performing an action, such as playing a sound clip, the action will be interrupted. To avoid this, we can introduce a slight delay before the object is destroyed, ensuring that the sound clip can finish playing first.
Here’s how to set this up:
- Add a Destroy node: Flowing from the
Audio Source Playnode, add aDestroynode with an object and time delay parameter. - Set the target to
This, which refers to the trash bag object. - Set the delay time to 0.5 seconds to match the length of the sound clip.
- Save your graph, then test it in Play mode to ensure the trash bag is destroyed only after the sound has finished playing.
This approach ensures that the trash bag remains in the scene for the entire duration of the sound clip before being destroyed, providing a smoother gameplay experience.
The following is a screenshot of the trash bag script graph for the OnTriggerEnter
Now that the trash bag is set up we can continue on with the trash bin behaviors.
🛠 Trash Bin Interactions
Tutorial: Trash bin Interactions
📝Visual scripting | 🕒30 minutes | 📂Required File: Park Clean-Up Game
In this tutorial we will set up the visual scripts for the trash bin interactions.
The trash bin will listen for events broadcast by the trash bags and keep track of the collected trash. By the end of this section, you'll have set up the trash bin prefab to listen for the event from the trash bags and manage the collection count.
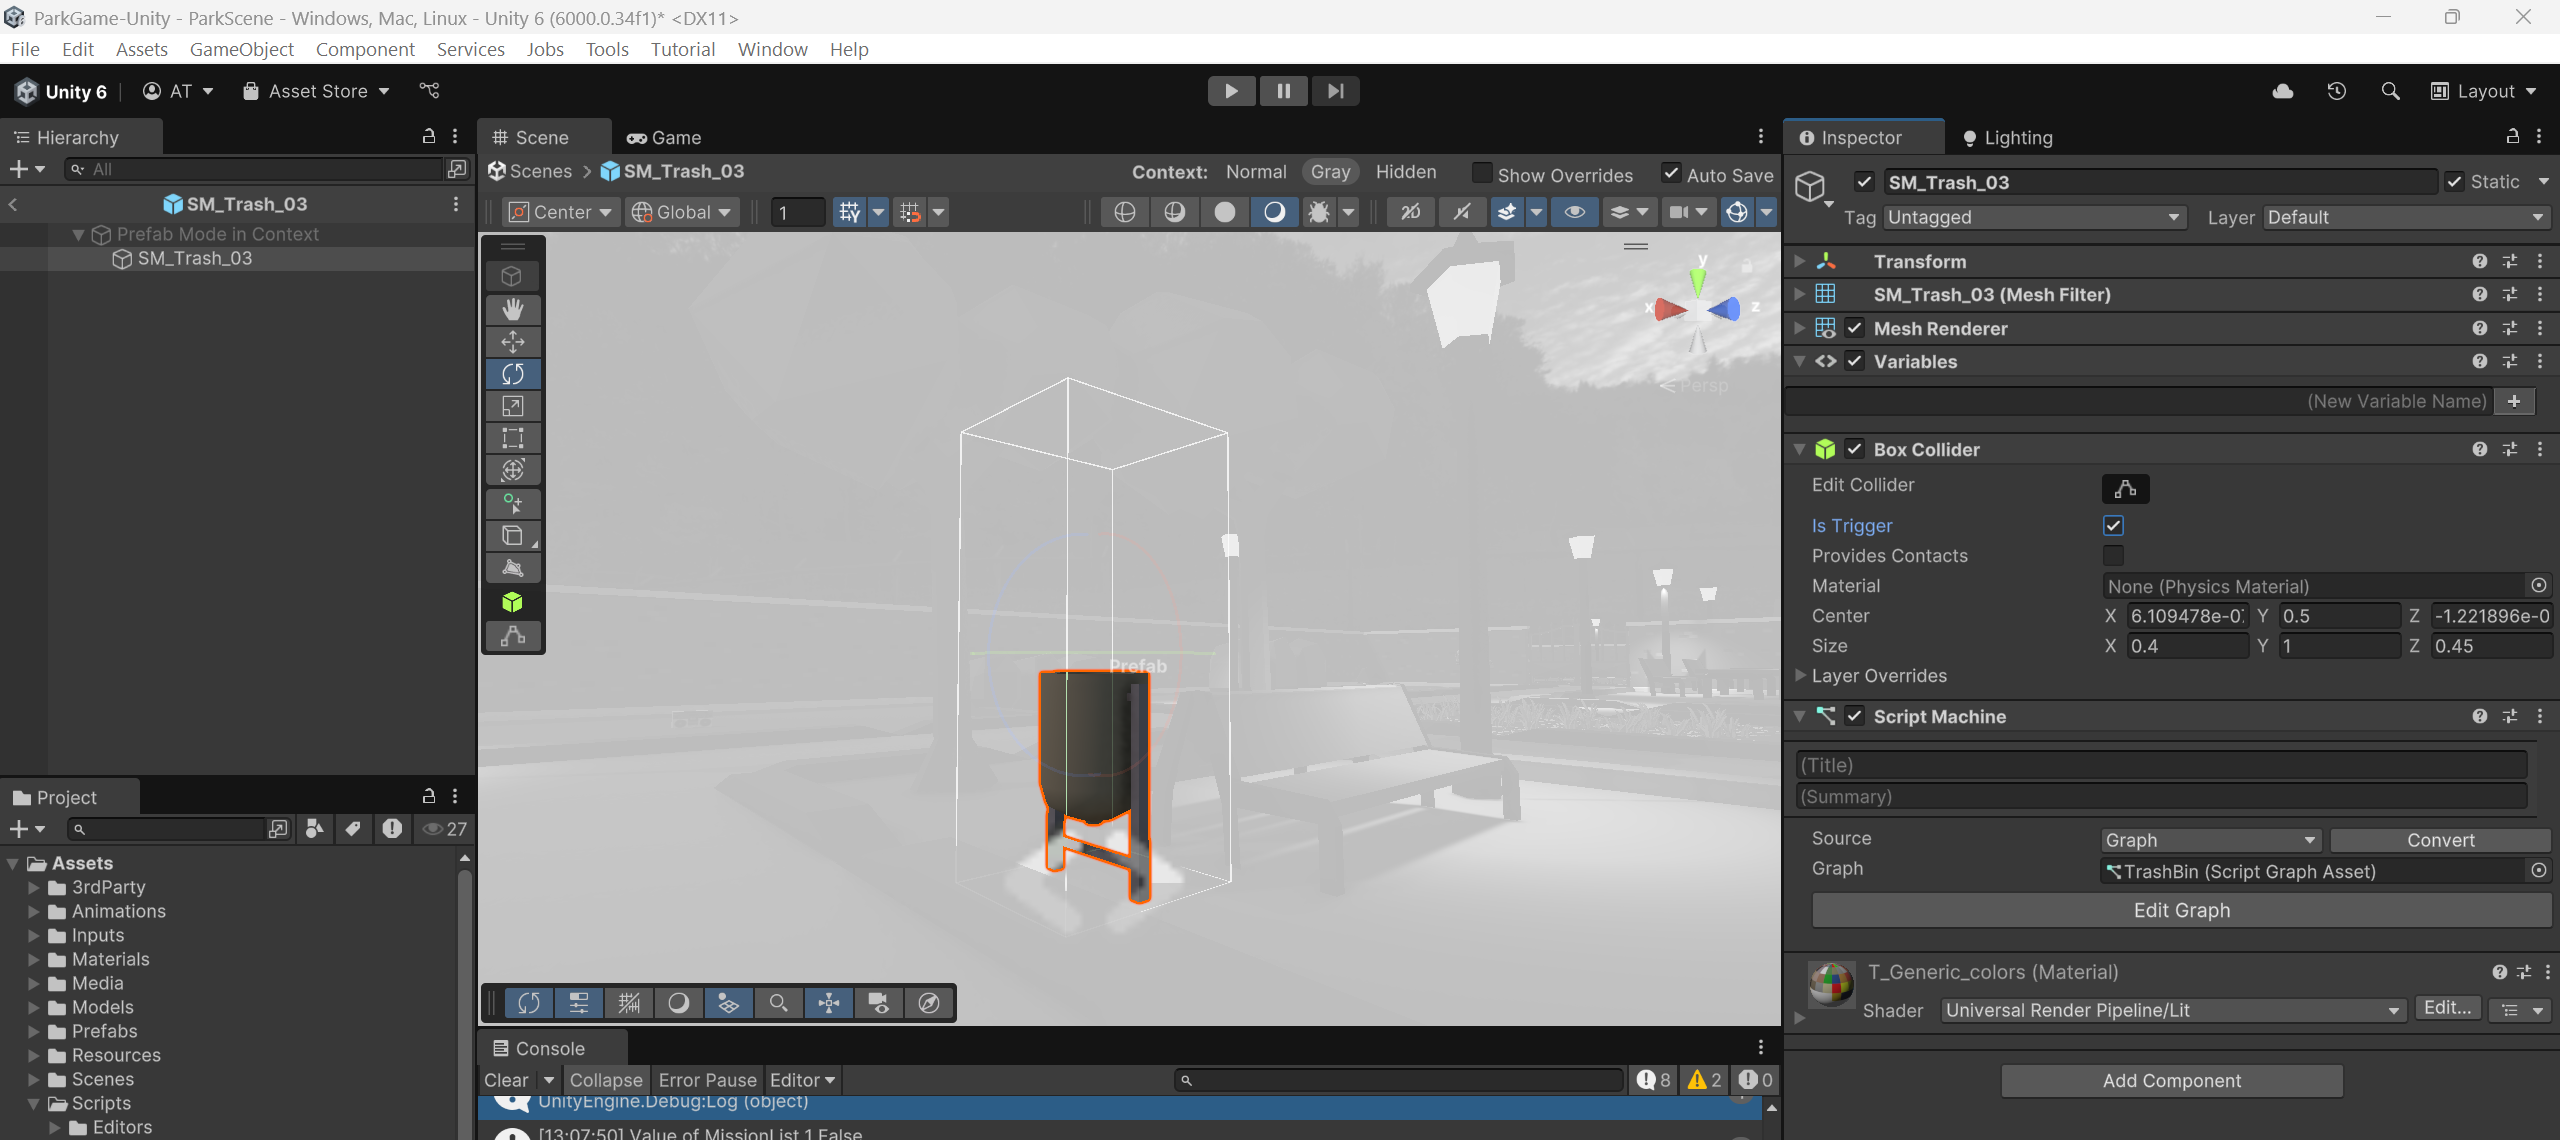
Step 1: Prepare the Trash Bin Prefab
Similar to the trash bags, the behavior of the trash bin is consistent across all instances. To maintain this consistency, we will add the script graph to the trash bin prefab, ensuring that all trash bins interact the same way.
-
Open the Trash Bin Prefab
- In the Hierarchy, locate a trash bin object in the Park Scene.
- Right-click the object and select
Prefab > Open Asset in Contextto edit the prefab directly.
-
Add a Box Collider (Trigger)
- With the trash bin prefab selected, go to the Inspector panel.
- Click
Add Componentand search forBox Collider. - Enable the
Is Triggeroption to allow interaction without physical collision. - Adjust the size of the box collider to ensure it can easily interact with the player and the trash bags.
-
Add a Script Machine
- Click
Add Componentand search forScript Machine. - In the
Script Machinecomponent, clickNewto create a new Script Graph. - Name the graph TrashBin and save it in your Scripts folder.
- Click
The following is a screenshot of the trash bin prefab with the above settings applied.
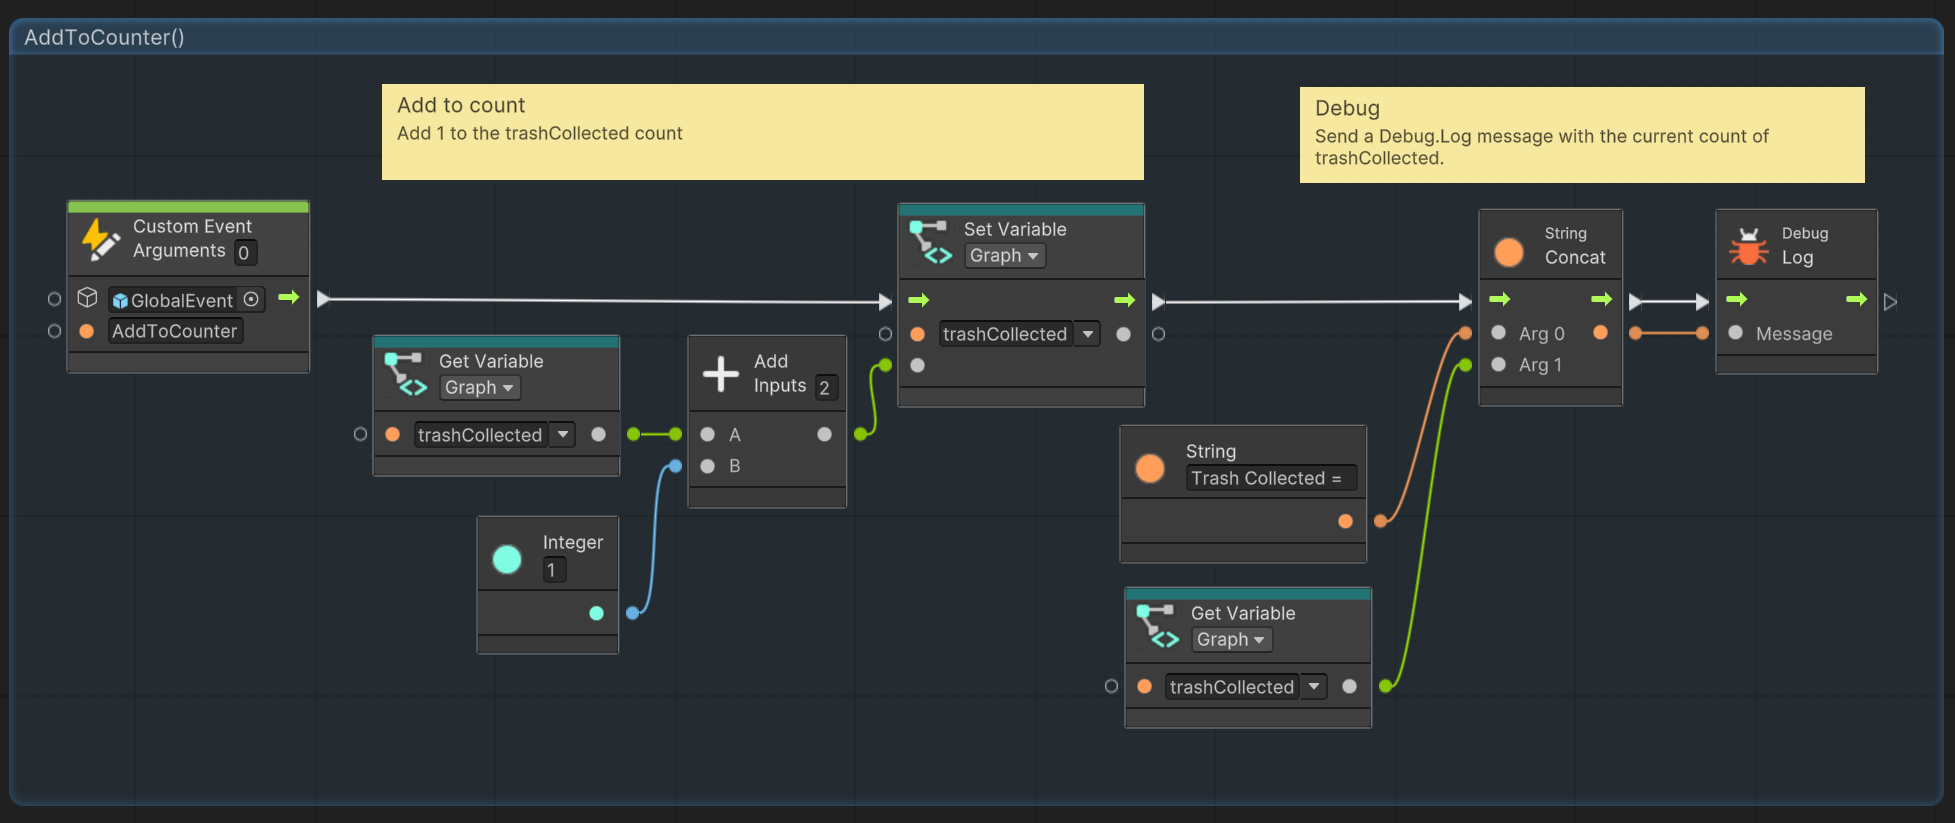
Step 2: Set Up AddToCounter Event
Decoupling is a good programming practice that ensures objects are independent and don’t rely too heavily on each other. In this case, we’re focusing on making the trash bins responsible for tracking the amount of trash collected, while the trash bags are simply responsible for triggering the event when they are interacted with.
In this setup, the trash bin will listen for the AddToCounter event, which is broadcast by the trash bags. The trash bin doesn't need to know anything about the trash bag itself, only that it should increase the count of collected trash when the event occurs.
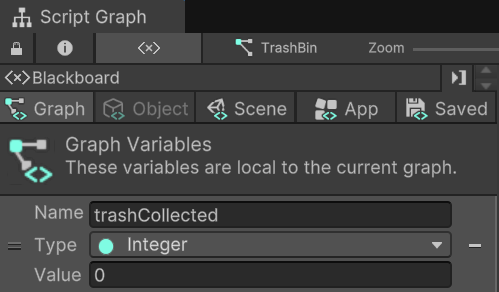
To keep track of the amount of trash collected, we need a variable. For this variable we use an int type as it only records a whole number (integer) value, and we will name this variable trashCollected. Since only the trash bins need to know and update this value, it’s best to set it up as a graph variable. Graph variables are private to the script graph, meaning they are only accessible within the graph itself and not from other objects or scripts. This ensures the trashCollected variable remains hidden (encapsulated) and maintains the decoupling of the trash bins and trash bags, avoiding unnecessary dependencies.
-
Open the Script Graph
- In the Inspector, locate the
Script Machinecomponent. - Click
Edit Graphto open the visual scripting editor.
- In the Inspector, locate the
-
Create Graph Variable
- In the Blackboard (the sidebar for managing variables), create a new graph variable named
trashCollected. This will be anintvariable that stores the number of trash bags collected.
- In the Blackboard (the sidebar for managing variables), create a new graph variable named
-
Remove Default Nodes
- In the script graph, delete the default
OnStartandOnUpdatenodes, as they are not needed for this interaction.
- In the script graph, delete the default
-
Add a Custom Trigger Event Node
- In the Graph Editor, right-click and search for
Custom Event. - Name the event
AddToCounter, this should match the name of the Custom Trigger Event set in the Trash Bag script graph. - Set the Target Object to the
GlobalEventprefab. This prefab acts as a global reference for all events and ensures that the event is properly broadcasted.
- In the Graph Editor, right-click and search for
The flow looks clear, but I've made a few corrections for typos and improved consistency in the language. Here's the refined version:
Step 3: Add to trashCollected
When the AddToCounter event is called, it should increment the trashCollected variable.
- Get the Graph Variable
- Add a
Get Graph Variablenode. - From the dropdown, select the
trashCollectedvariable.
- Add a
-
Add to the Variable
- Right-click in the graph window and find the
Add Inputsnode. - Attach the
Get Graph Variablenode from the previous step to Value A. - Add an
Integer(literal) node and set its value to 1. - Attach the
Integernode to Value B on theAdd Inputsnode.
- Right-click in the graph window and find the
-
Set the
trashCollectedVariable- Search for the
Set Graph Variablenode and set it totrashCollected. - Attach the
Add Inputsnode to the Value input. - Set the flow from the
AddToCounterevent into theSet Graph Variable.
- Search for the
To ensure the trashCollected variable is updating, we will log its value using a Debug Log.
-
Debugging
trashCollected- Create a
Debug Lognode. - Add a
String Concatnode to combine multiple arguments (values) as the message. - Add a
String Literalnode with the value set to Trash collected =. Make sure to include a space after the equals sign to avoid the value printing too close. - Set the
String Literalnode as the first value in theString Concatarguments. - Add a
Get Graph Variablenode to retrieve the value oftrashCollectedand connect it to the second argument of theString Concatnode. - Set the
String Concatnode as the message value for theDebug Lognode.
- Create a
-
Test the Interaction
- Save the graph and close the Script Graph window.
- Enter Play Mode in Unity and move the player toward a trash bag.
- Check the Console to verify the correct debug message appears after the trash bag is collected.
- Note that while the
AddToCounterevent is properly called, no actual interaction with the trash bin is needed for this test.
The final AddToCounter event on the Trash Bin should look like the following image:
Good programming practices involve using a consistent naming convention to quickly identify the type of variables. While it's not as crucial in visual scripting, maintaining this practice helps as you transition to full code. One common naming convention is to use camelCase for private variables (those only accessible by the script or graph) and PascalCase for public (scene) variables.
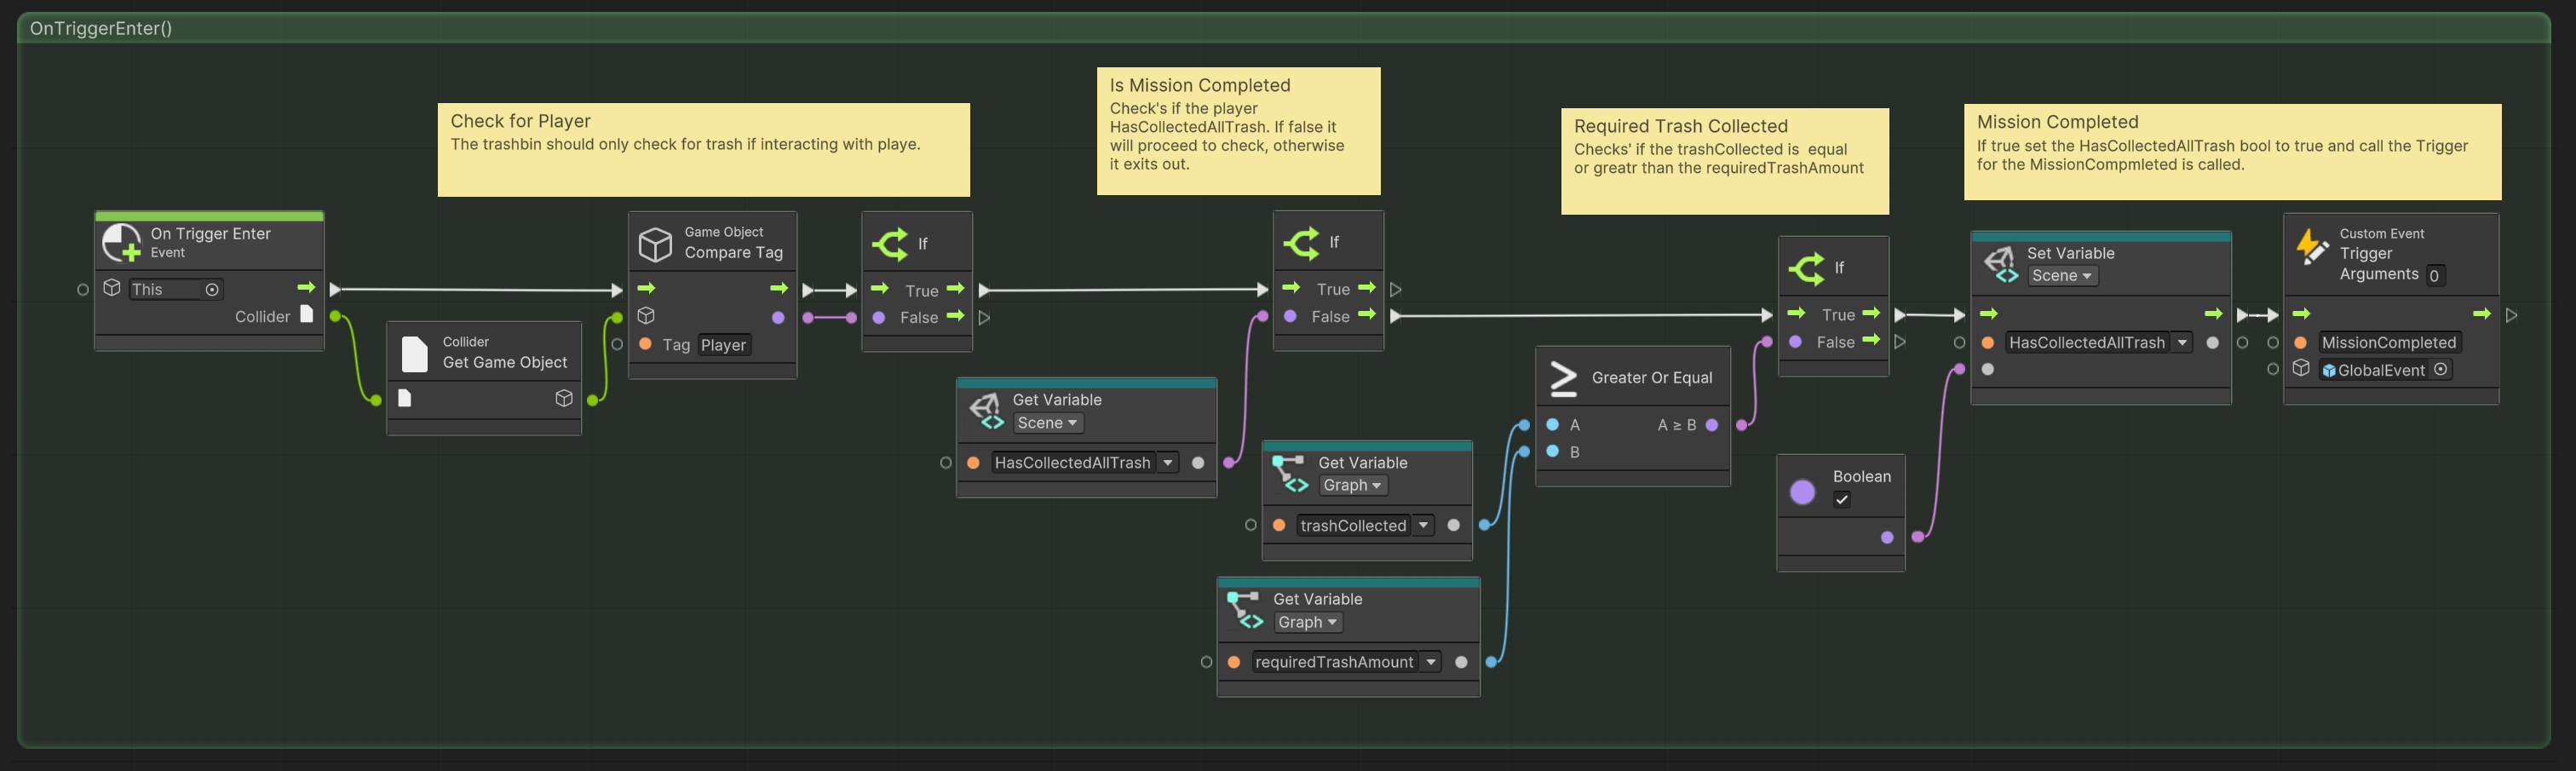
Step 4: Set Up OnTriggerEnter for Player Interaction
While the AddToCounter event tracks trash collection, it doesn't allow the player to check if all required trash has been collected. To address this, an OnTriggerEnter event will be used when the player interacts with a trash bin. This interaction provides visual feedback and confirms whether all trash has been collected.
-
Update the Trash Bin Prefab
- Open the Trash Bin Prefab in Context.
- In the Inspector, locate the
Script Machinecomponent. - Click
Edit Graphto open the Visual Scripting Editor.
-
Add an
OnTriggerEnterNode- In the Graph Editor, right-click and search for
OnTriggerEnter. - This node will trigger when another object enters the trash bin's
Box Collider.
- In the Graph Editor, right-click and search for
-
Check If the Player Entered the Trigger
- Add a
Collider → Get Game Objectnode and connect it toOnTriggerEnter. - Add a
Game Object → Compare Tagnode and set the tag to Player. - Connect the
Get Game Objectnode to theCompare Tagnode. - Add an
If(Branching Node) and connect theCompare Tagoutput.
- Add a
Step 5: Check if Player HasCollectedAllTrash
We only want the OnTriggerEnter event to proceed if the player has not already collected all the trash. If all trash is collected, there’s no need to recheck the condition.
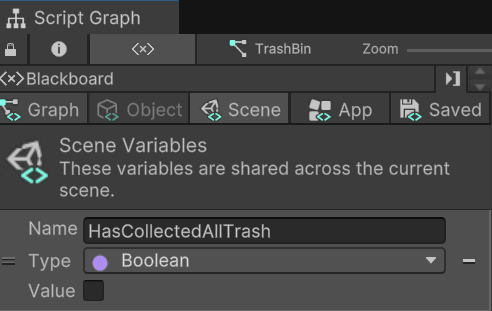
To track this, we will create a scene variable named HasCollectedAllTrash. Unlike a graph variable, which is tied to a specific object’s script graph, a scene variable is shared across all objects in the scene. This ensures that all trash bins reference the same global value, preventing inconsistencies and allowing any bin to check if all required trash has been collected.
- Create a Scene Variable
- In the Blackboard (variable management sidebar), create a new scene variable named
HasCollectedAllTrash. - Set its type to Boolean (bool) and ensure its default value is false (unchecked).
- In the Blackboard (variable management sidebar), create a new scene variable named
- Check the Variable’s Value
- Add a
Get Graph Variablenode forHasCollectedAllTrash. - Add an
If(Branching Node). - Set the
Get Graph Variablenode as the condition to check. - Connect the true flow from the previous
Ifnode (which checks thePlayertag) to this newIfnode.
- Add a
Step 6: Compare trashCollected with requiredTrashAmount
In order to properly check if we collected all the trash, we need to know the required amount of trash there is to be collected. There are many different ways we could handle this, but for simplicity we are simply going to create a graph variable that stores this value, one that we will need to set up here in the script graph.
- Create Graph Variable
- In the Blackboard (the sidebar for managing variables), create a new graph variable named
requiredTrashAmount. This will be anintvariable. - Set the value of
requiredTrashAmountto whatever the amount is. - Tip: For testing, set it to a small number like 1 or 2 to avoid unnecessary collection.
- In the Blackboard (the sidebar for managing variables), create a new graph variable named

- Comparing Variables
- Add two
Get Graph Variablenodes:- One for
trashCollected. - One for
requiredTrashAmount.
- One for
- Add a
Greater or Equalnode.- Connect
trashCollectedto A - Connect
requiredTrashAmountto B
- Connect
- Add an
If(Branching Node) and use theGreater or Equalnode as the condition. - Connect the false flow from the
HasCollectedAllTrashcheck to this newIfnode.
- Add two
Remember here we only want to check if the trash collected is greater or equal to the required trash amount only if HasCollectedAllTrash is FALSE. If it is true, that means we have collected all the trash and no need to check again.
Step 7: Mission Completed
When all trash is collected, we need to notify the game that the mission is complete. This information isn’t just for the trash bins, it may also be needed by other objects in the game, such as UI elements or mission trackers. To handle this, we will send a global event, ensuring that any relevant game system can respond appropriately.
-
Set the HasCompletedAll Trash to True
- Add a
Set Graph VariableforHasCollectedAllTrashnode - Add a
Bool(literal) node and set it to true (checked) - Set the flow of the previous
ifnode, that tested for theGreater or Equaltrue value to theSet Graph VariableforHasCollectedAllTrashnode
- Add a
-
Mission Completed Event
- Create a new
Custom Eventnode and name itMissionCompleted - Set the target object to the
GlobalEvent
- Create a new
The final OnTriggerEnter logic for the Trash Bin should look like this:
To test the OnTriggerEnter behaviors of the trash bins, add a Debug Log after the initial Get Graph Variable check for HasCollectedAllTrash. Connect the false and true flows from the if node both into the Debug Log to output its value. Set requiredTrashAmount to a small number like 2, then play the game. Collect one trash bag and interact with a trash bin, the log should show false. After collecting the second bag and returning to the bin, it should now output true.
Managing Missions
As mentioned earlier, each game object should be responsible for managing its own data. However, in some cases, we need to track broader aspects of the game. For example, we need a way to manage the progression of different missions (or quests, objectives—whatever you choose to call them). The completion of these missions determines how the player advances through the level or scene.
To handle this, we will use a game manager—specifically, a Level Manager. In our lesson on visualizing loops, we developed a Level Manager flowchart that outlines its key behaviors. This includes storing information about each level and monitoring when a mission is completed to trigger progression.
🛠 Creating a Level Manager
Tutorial: Creating a Level Manager
📝Visual scripting | 🕒30 minutes | 📂Required File: Park Clean-Up Game
In this tutorial we will set up the visual scripts for the level manager.
Step 1: Setting Up the Level Manager
Unity operates on an object-based system, meaning every action or behavior in the game must be associated with a GameObject. While our Level Manager does not need to be a visible object in the game world, it still needs to exist as a GameObject. To achieve this, we will create an empty GameObject to serve as the Level Manager.
-
Create the Level Manager Object
- In the Hierarchy, create a new Empty GameObject.
- Rename it to
Level Manager. - Drag
Level Managerinto the Project Window to turn it into a Prefab. - In the Hierarchy, select
Level Manager. - Right-click the object and choose Prefab > Open Asset in Context to edit the prefab directly.
-
Add a Script Machine
- Click Add Component and search for
Script Machine. - In the Script Machine component, click
Newto create a new Script Graph. - Name the graph
Level Managerand save it in your Scripts folder.
- Click Add Component and search for
-
Remove Update Node
- In the script graph, delete the default
OnUpdatenodes, as it will not be needed for this interaction. - Keep the
OnStartnode, we will use this later.
- In the script graph, delete the default
Step 2: Defining the Number of Missions
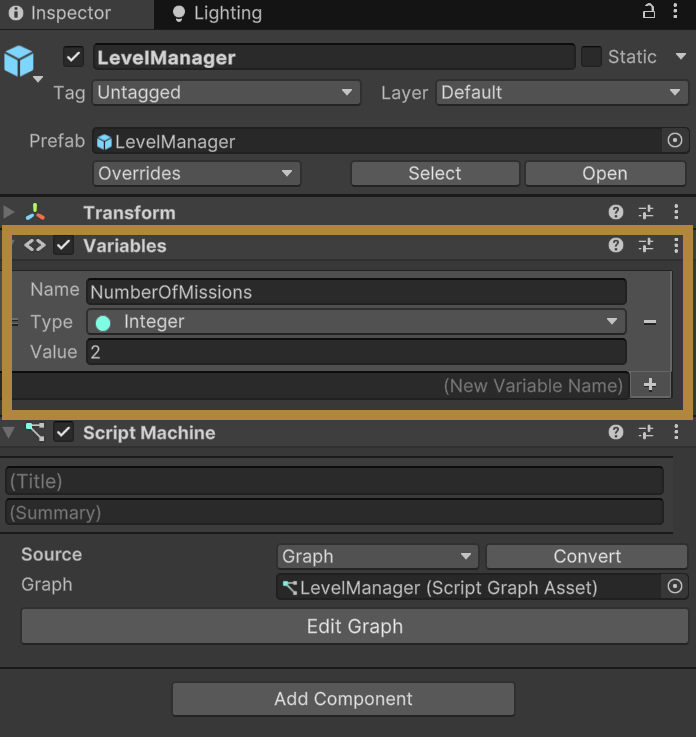
The Level Manager needs to track the number of missions in the scene or level. To do this, we will create an integer variable called NumberOfMissions. Since the number of missions may vary between levels or scenes, each instance of the Level Manager should maintain its own count.
Using a graph variable wouldn't work, as each scene may have a different number of missions. A scene variable is also unnecessary because the value doesn’t need to be accessed globally. Instead, we will use an object variable, which stores data specific to the instance of the Level Manager within the scene.
- Create an Object Variable
- Open the Blackboard (variable management sidebar).
- Create a new object variable named
NumberOfMissions. - Set its type to int and assign it a default value greater than zero.
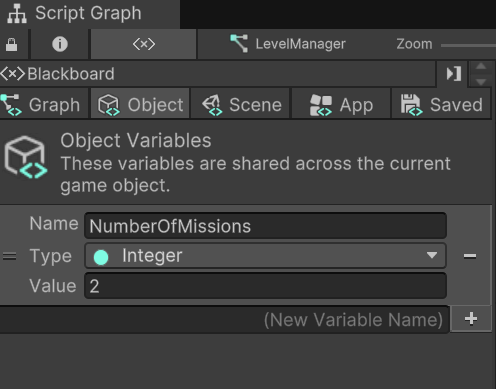
The exact number of missions will vary depending on the scene or level. However, we can set a default value as a starting point and for testing purposes. This value can be adjusted for each scene by selecting the Level Manager in the Inspector and updating the object variable accordingly.
Step 3: Creating a Mission List
Next, we will use the value of NumberOfMissions to create a MissionList, which will track whether each mission is complete (true or false). This will be implemented as a List of Booleans, where each item in the list corresponds to a mission and is referenced by its index number (e.g., MissionList[0], MissionList[1]). The associated value will indicate whether the mission is completed (true) or not (false).
Since multiple game objects may need to check mission progress—for example, a gate may need to verify mission completion before opening—the MissionList must be accessible beyond the Level Manager. For this reason, it will be created as a scene variable.
- Create a Scene Variable
- Open the Blackboard (variable management sidebar).
- Create a new scene variable named
MissionList. - Set its type to List of Booleans.
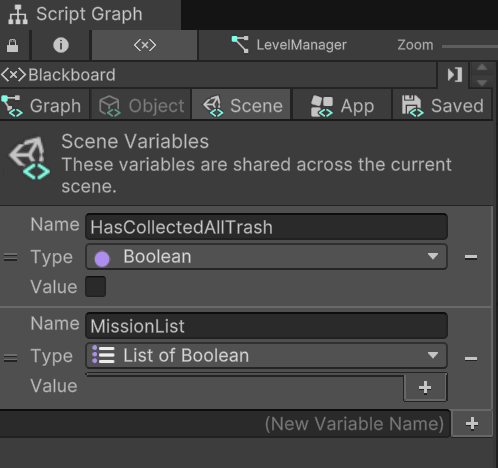
In the Scene Variables tab of the Script Graph Blackboard, you may also see the HasCollectedAllTrash variable created for the Trash Bin. Remember that scene variables are global and can be accessed from any graph. As a result, all scene variables will always appear in the Blackboard of any Script Graph in the scene.
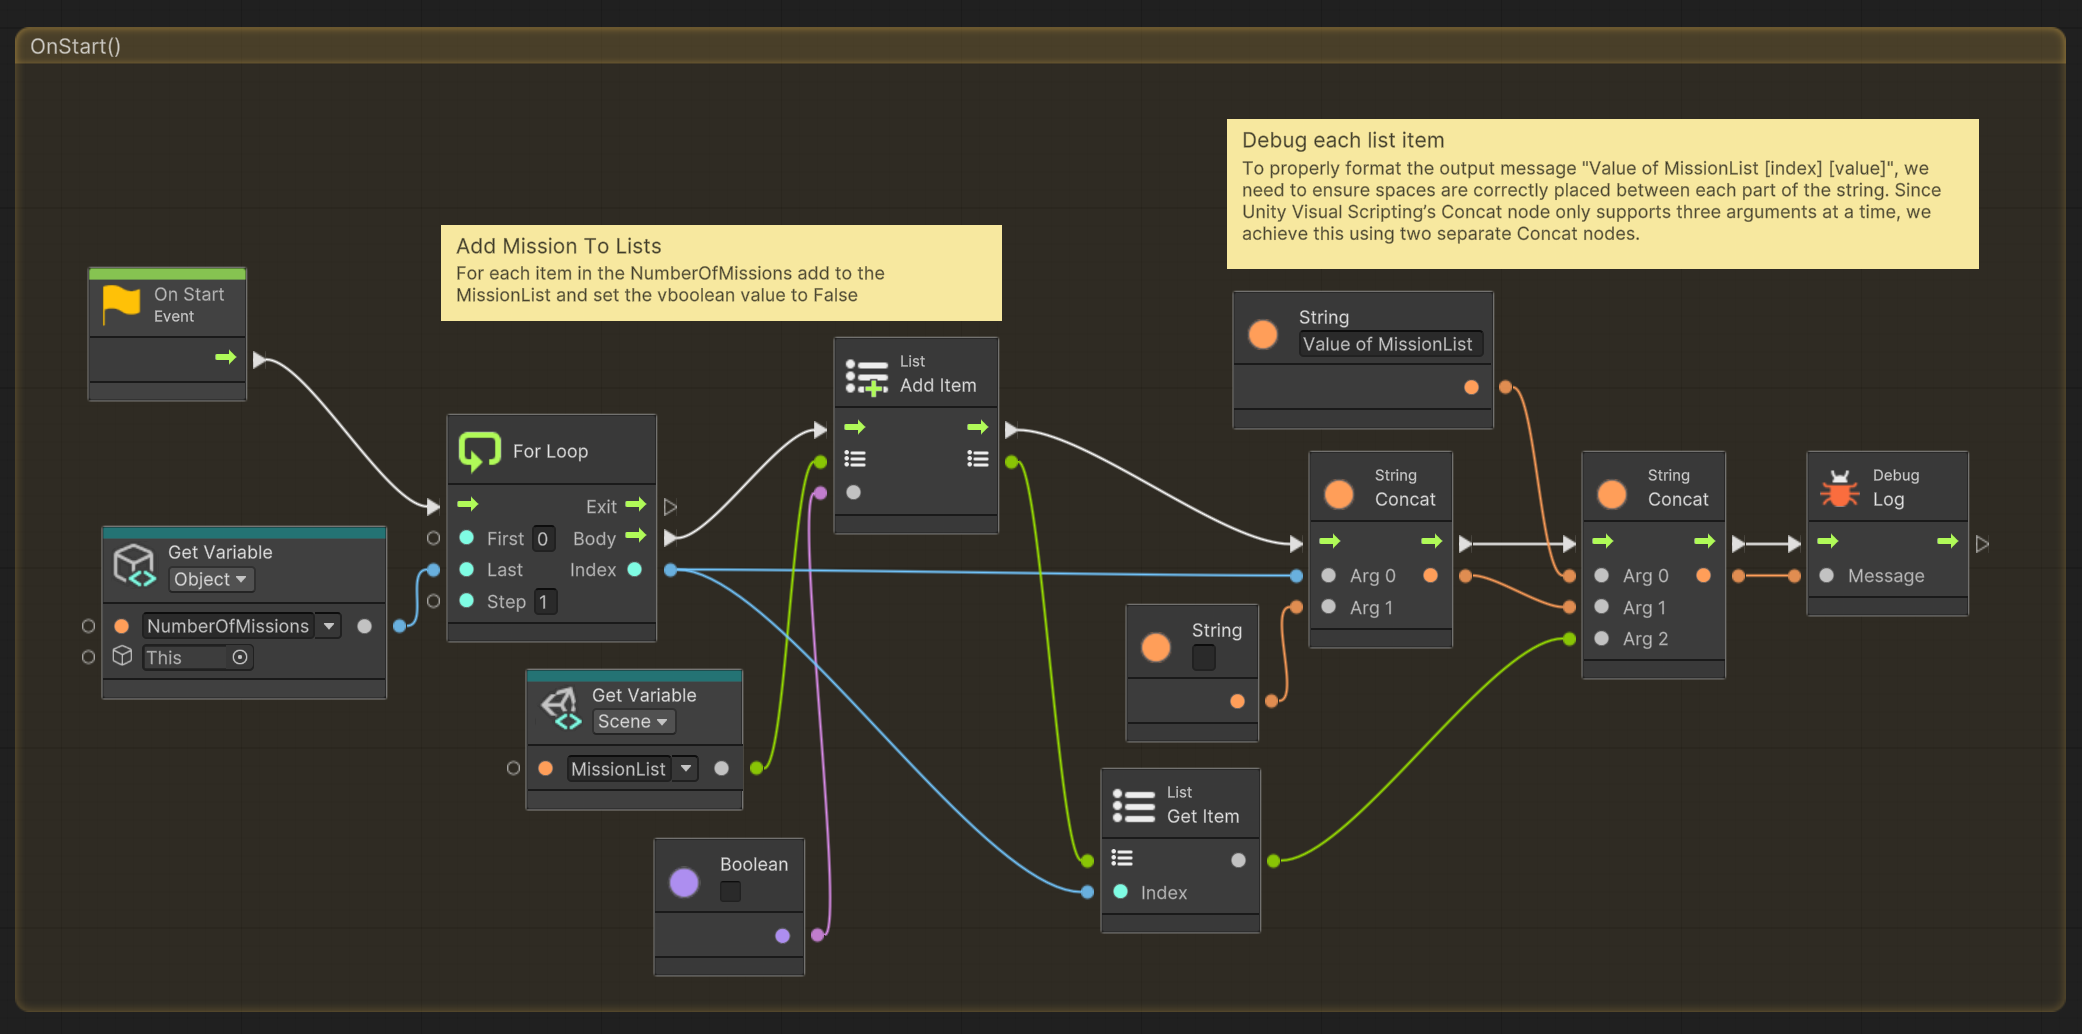
Step 4: Populating the Mission List
Currently, we have a MissionList, but it doesn't contain any items. We need to populate it by adding one item for each NumberOfMissions. Since this initialization only needs to happen once, we’ll add it to the existing OnStart node.
-
Creating a For Loop
- Right-click in the graph window and add a
For Loopnode. - Connect the flow from the
OnStartnode to theFor Loopnode. - Add a
Get Object Variablenode forNumberOfMissionsand set this as the value for Last in theFor Loopnode.
- Right-click in the graph window and add a
-
Adding List Items
- Create an
Add List Itemnode. - Connect the body output of the
For Loopto theAdd List Itemnode.- Add a
Get Scene Variablenode forMissionList, and set it as the list input forAdd List Item. - Add a
Bool(literal) node set to false (unchecked) and connect it to the value input ofAdd List Item.
- Add a
- Create an
Step 5: Debugging the List
To ensure that the list populates correctly, we can log a message to the Console, displaying each list item’s index and value. To format the message in a readable way, we will use String Concat nodes. The output should follow this format below, where i is the index number of the list item.
Value of MissionList i false
-
Add String Nodes
- Add a
String(literal) node and set its value to "Value of MissionList " (include a space at the end). - Add a
String Concatnode with two args:- Connect the index output from the
For Loopto arg 0 ofString Concat. - Add another
String(literal) node containing a single space and connect it to arg 1.
- Connect the index output from the
- Create a second
String Concatnode with three args:- Set arg 0 to the
"Value of MissionList "string. - Set arg 1 to the first
String Concatoutput.
- Set arg 0 to the
- Add a
-
Get List Value
- Add a
Get List Itemnode to retrieve each mission’s value:- Connect the list input of
Get List Itemto theMissionListscene variable. - Connect the index from the
For Loopto the index input ofGet List Item.
- Connect the list input of
- Set the arg 2 input of the second
String Concatnode to the output ofGet List Item.
- Add a
-
Debug Log Message
- Add a
Debug Lognode. - Connect the output of the second
String Concatto theDebug Lognode’s message input.
- Add a
-
Testing the List
- Save the graph and close the Script Graph window.
- Enter Play Mode.
- Check the Console to confirm that a debug log message appears for each mission.
After implementing these steps, the OnStart logic for the Level Manager should resemble the following:
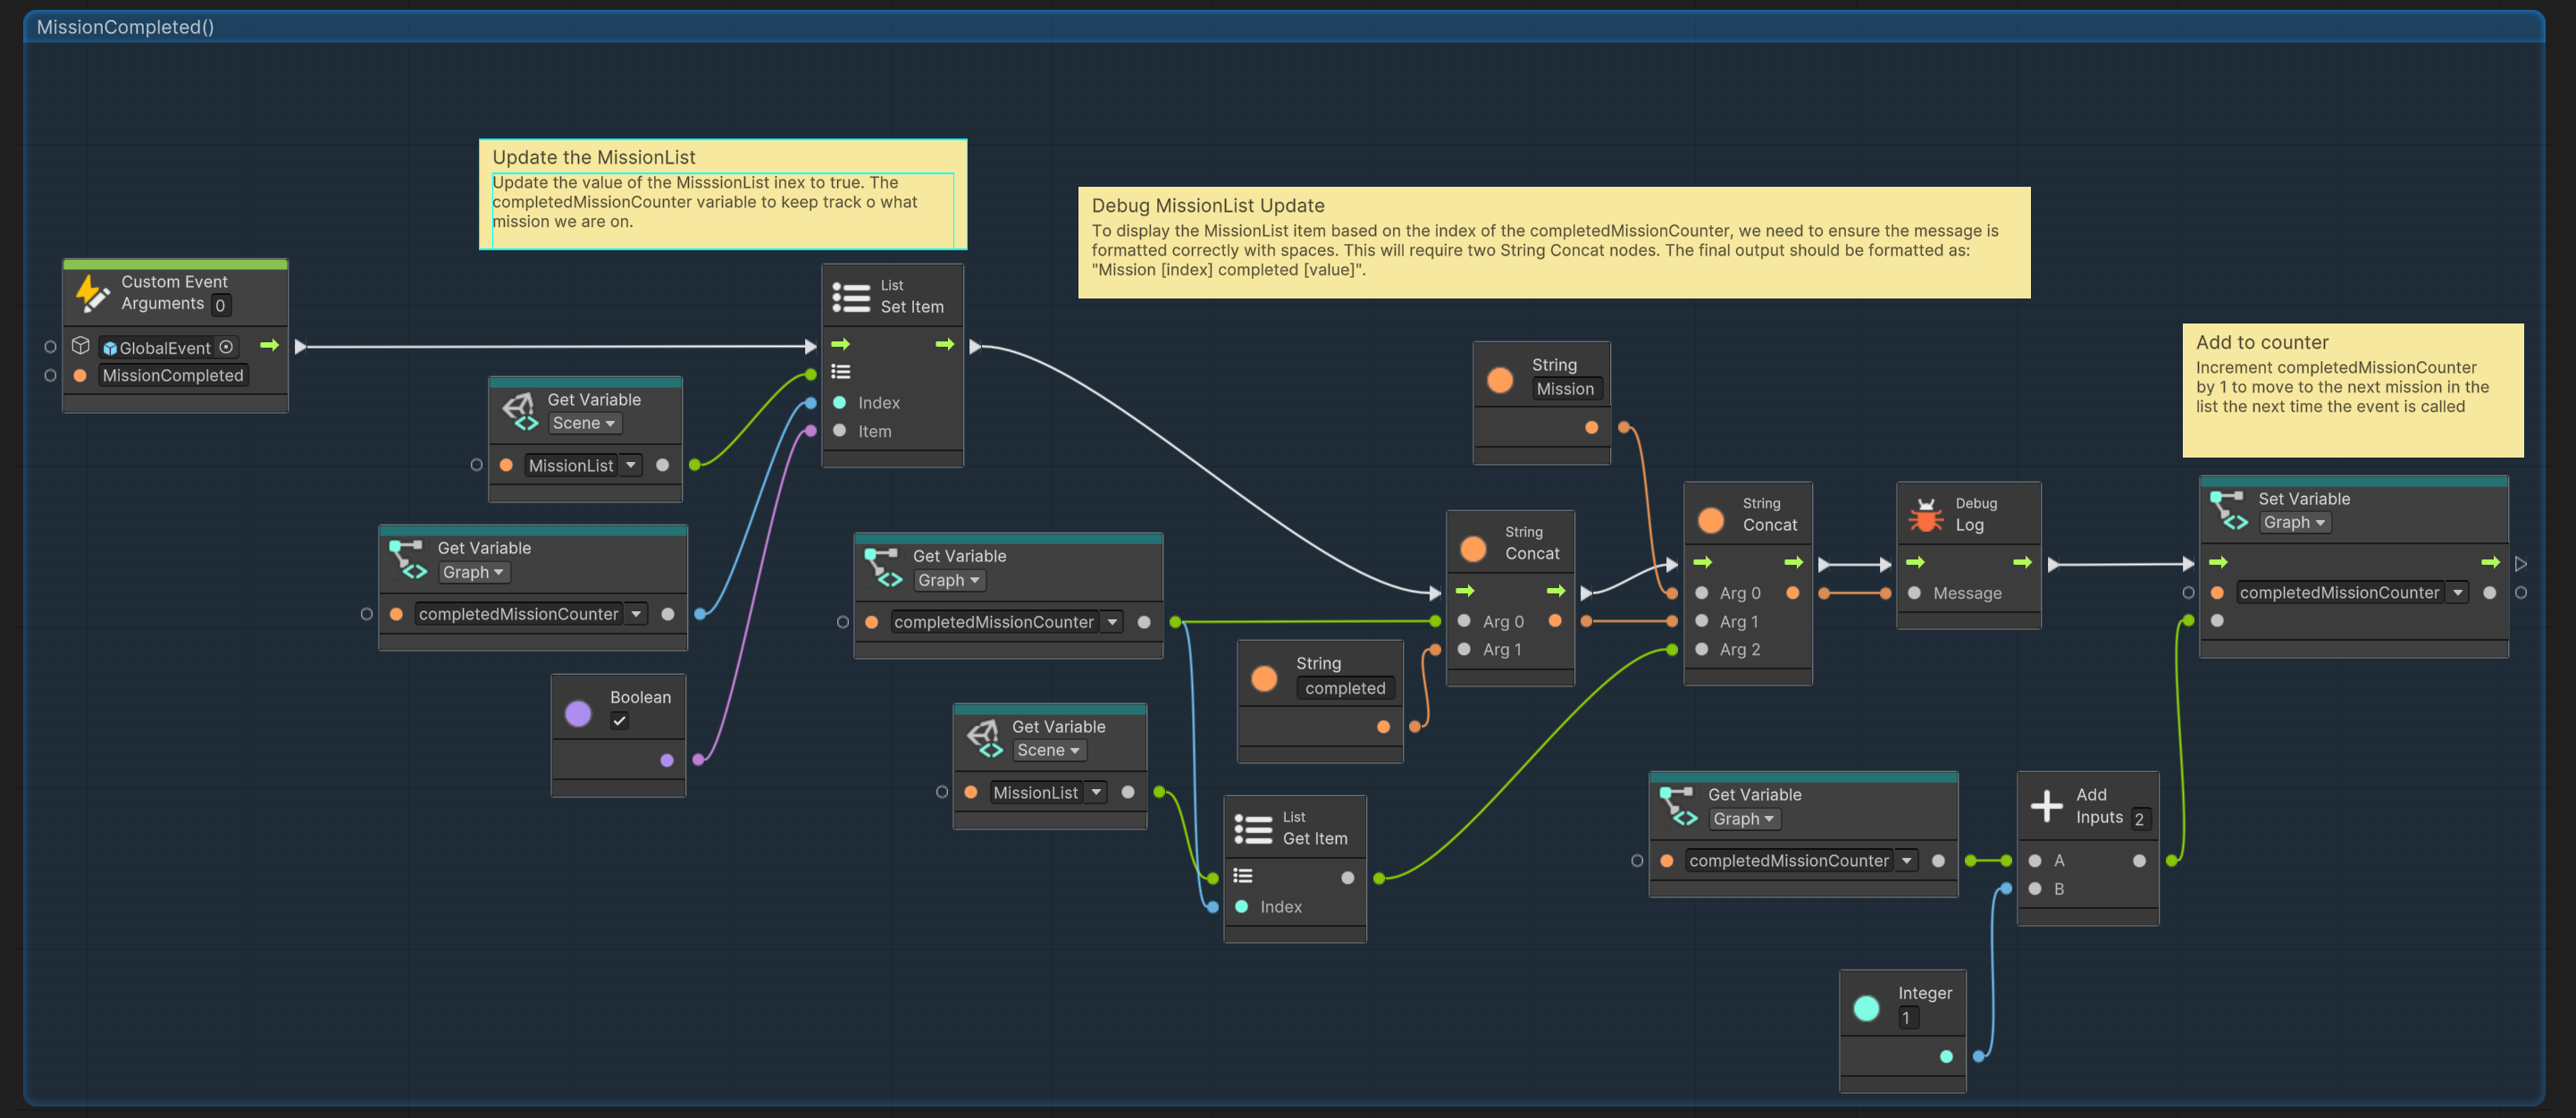
Step 6: Handling Mission Completion
Whenever a mission is completed, the related objects will trigger the MissionCompleted event, similar to how we set up the Trash Bin earlier. The LevelManager will listen for this event and update the corresponding mission value in the MissionList.
- Add a Custom Trigger Event Node
- Open the Graph Editor, right-click, and search for
Custom Event. - Name the event
MissionCompleted. This should match the Custom Trigger Event set in the Trash Bin script graph. - Set the Target Object to the
GlobalEventprefab. This ensures the event is broadcasted properly across all game objects.
- Open the Graph Editor, right-click, and search for
Step 7: Updating the MissionList
To track which mission has been completed, we need a way to reference the appropriate index in the MissionList. For simplicity, we assume that missions are completed in sequential order. To manage this, we'll use an integer variable called completedMissionCounter, which will be stored as a graph variable in the LevelManager.
-
Create a Graph Variable
- Open the Blackboard (variable management sidebar).
- Create a new graph variable named
completedMissionCounter. - Set its type to int and initialize it with a value of 0.
-
Update the Mission Item
- Add a
Set List Itemnode:- Set the list input to a
Get Scene Variablenode forMissionList. - Set the index input to a
Get Graph Variablenode forcompletedMissionCounter. - Set the item value to a
Bool(literal) node set to true (checked).
- Set the list input to a
- Add a
Step 8: Debugging Updated Missions
Now, we'll add a Debug Log message to confirm that mission completion is being updated correctly. This will be similar to how we debugged MissionList creation in Step 5.
-
Create a Debug Message
- Add a
String Concatnode with two args:- Arg 0: A
Get Graph Variablenode forcompletedMissionCounter. - Arg 1: A
String(literal) node with the text " completed " (include spaces before and after).
- Arg 0: A
- Connect the flow output from the
Set List Itemnode to theString Concatnode.
- Add a
-
Format the Debug Message
- Add another
String(literal) node with the value "Mission " (including a trailing space). - Create a second
String Concatnode with three args:- Arg 0: The
"Mission "string node. - Arg 1: The output from the first
String Concatnode. - Arg 2: The value of the completed mission from the list (retrieved in the next step).
- Arg 0: The
- Add another
-
Retrieve the Mission's Value
- Add a
Get List Itemnode to fetch the mission's current status:- Set the list input to a
Get Scene VariableforMissionList. - Set the index input to a
Get Graph VariableforcompletedMissionCounter.
- Set the list input to a
- Connect the output of
Get List Itemto Arg 2 of the secondString Concatnode.
- Add a
-
Output to the Console
- Add a
Debug Lognode. - Connect the output of the second
String Concatnode to the message input ofDebug Log.
- Add a
-
Test the Mission Completion
- Save the graph and close the Script Graph window.
- Enter Play Mode.
- Complete a mission by collecting the required trash bags and delivering them to the trash bin.
- Check the Console for a debug log message confirming mission completion (e.g., "Mission 0 completed true").
Step 9: Incrementing the Counter
After completing a mission, we need to increment completedMissionCounter so that the next mission can be tracked correctly.
- Update the Counter
- From the
Debug Lognode, connect the flow output into aSet Graph Variablenode forcompletedMissionCounter. - Right-click in the Graph Editor and add an
Add (int)node:- Set A to a
Get Graph Variablenode forcompletedMissionCounter. - Set B to an
Integer(literal) node with a value of 1.
- Set A to a
- Connect the output of
Add (int)to the value input ofSet Graph Variable.
- From the
Now, each time MissionCompleted is triggered, the system will update the correct mission in MissionList and move on to the next one. The final MissionCompleted event in the script graph should appear as the following:
Unlocking Gates
Now that our Park Clean-Up Game has the trash collection mission built and the LevelManager keeping track of completed missions, the last step is to set up the level (area) gates to unlock once a mission is completed.
Previously, we created an Animator controller to manage the gate's animation states. This controller consists of three states:
- Idle State – The default state when the gate is neither opening nor closing.
- ANIM_GateOpen – The animation clip of the gate opening.
- ANIM_GateClose – The animation clip of the gate closing.
State transitions are controlled by two Animator parameters (think of these as variables) named isGateOpen and canGateOpen. When the player interacts with the gate (by entering its trigger zone), we will use a script graph to get and set these variables, triggering the correct animation.
For a more detailed breakdown of the gate’s interaction flow and the game logic challenges associated with transition triggers, refer to the Object Flowchart example in the Visualizing Loops lesson.
🛠 Gate Interactions
Tutorial: Creating a Level Manager
📝Visual scripting | 🕒30 minutes | 📂Required File: Park Clean-Up Game
In this tutorial we will set up the visual scripts for the gate
Step 1: Prepare the Gate Prefab
To set up the Gate prefab for interaction, follow these steps:
-
Open the Gate Prefab
- In the Hierarchy, locate a Gate instance in the Park Scene.
- Right-click the object and select
Prefab > Open Asset in Contextto edit the prefab directly.
-
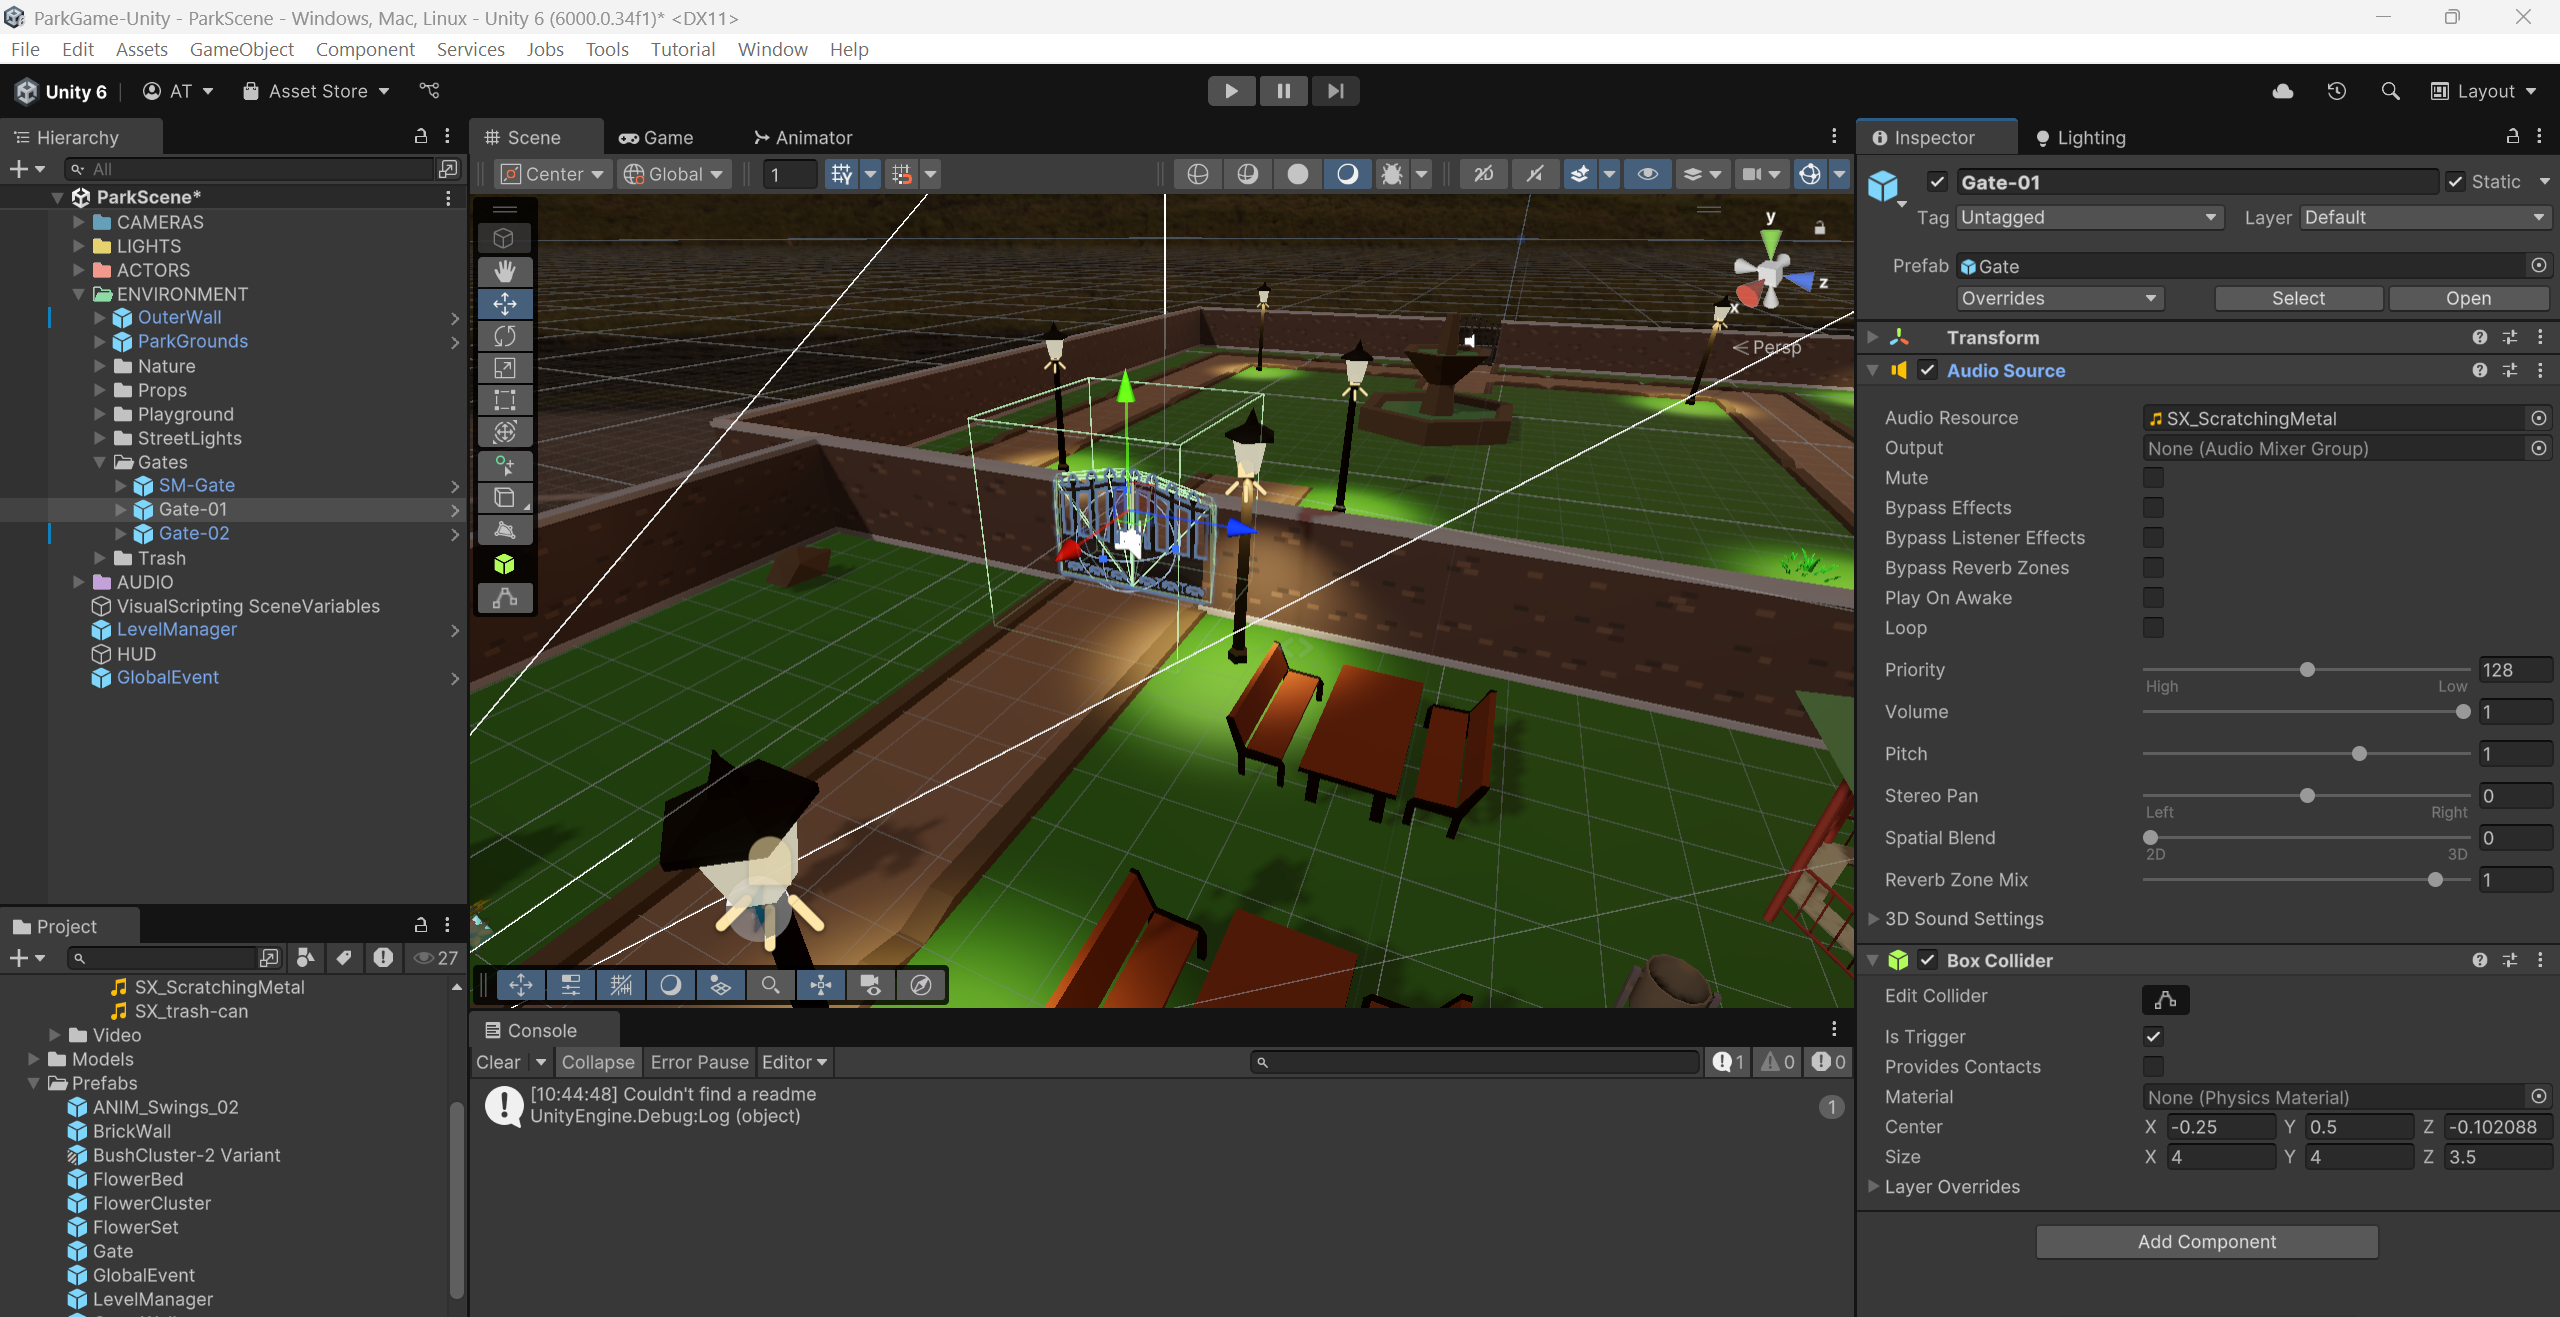
Add a Box Collider (Trigger)
- With the trash bag prefab selected, go to the Inspector panel.
- Click
Add Componentand search forBox Collider. - Enable
Is Triggerto allow interaction without physical collision. - Set the size of the box collider to allow for easy interaction with the player and trash bag.
-
Add an Audio Source
- Click
Add Componentand search forAudio Source. - In the
Audio Sourcecomponent, uncheckPlay on Awakeso the sound only plays when triggered. - Set the
Loopto unchecked as this clip will only play once. - Click the
Audio Clipfield and assign the SX_ScratchingMetal.wav sound file. - Exit Prefab mode and return to the scene.
- Click
The following is a screenshot of the trash bag prefab with the above setting applied
Step 2: Creating the Gate Script Graph
Because not every gate will be an unlock able gate to the next level, we do not necessarily need the script graph on every gate prefab. In this case, we can simply create new script graph in our project window and them add them to the gate instances that will need them.
-
Create Script Graph
- In the project window navigate to the Scripts folder
- Right-click and choose
Create> Visual SCripting > Script Graph - Name this script graph
Gate
-
Add a Script Machine
- In the Hierarchy window find and select the Gate prefab to is the first gate to the next level (area).
- In the Inspector window add click
Add Componentand search forScript Machine. - In the
Script Machinecomponent, drag and drop the Gate script graph from the project window into to theScriptMachine - Click
Edit Graphto open the visual scripting editor.
Step 2: Set Up OnTriggerEnter for Player Interaction
-
Remove Unnecessary Nodes
- In the Script Graph, delete the default
OnStartandOnUpdatenodes, as they are not needed for this interaction.
- In the Script Graph, delete the default
-
Add an OnTriggerEnter Node
- In the Graph Editor, right-click and search for
OnTriggerEnter. - This node will trigger when another object enters the trash bag's
Box Collider.
- In the Graph Editor, right-click and search for
-
Check if the Player Entered the Trigger
- Add a
Collider → Get Game Objectnode and connect it toOnTriggerEnter. - Add a
Game Object → Compare Tagnode and set the tag to Player. - Connect the
Get Game Objectnode to theCompare Tagnode.
- Add a
-
Test OnTriggerEnter with Debug Logs
- Add an
If(Branching) node and connect the output ofCompare Tag. - Create a
Debug Lognode and a String Literal node. - Set the String Literal to "Player Entered" and connect it to the True output of the
Ifnode. - Add a second
Debug Lognode and String Literal, setting its message to "Player did not enter". - Connect this to the False output of the
Ifnode.
- Add an
-
Test the Interaction
- Save the graph and close the Script Graph window.
- Enter Play Mode in Unity and move the player toward a Gate.
- Check the Console to verify the correct debug message appears when entering the trash bag's trigger.
Once the debug messages confirm the interaction is working, we can proceed with implementing the actual Gate logic.
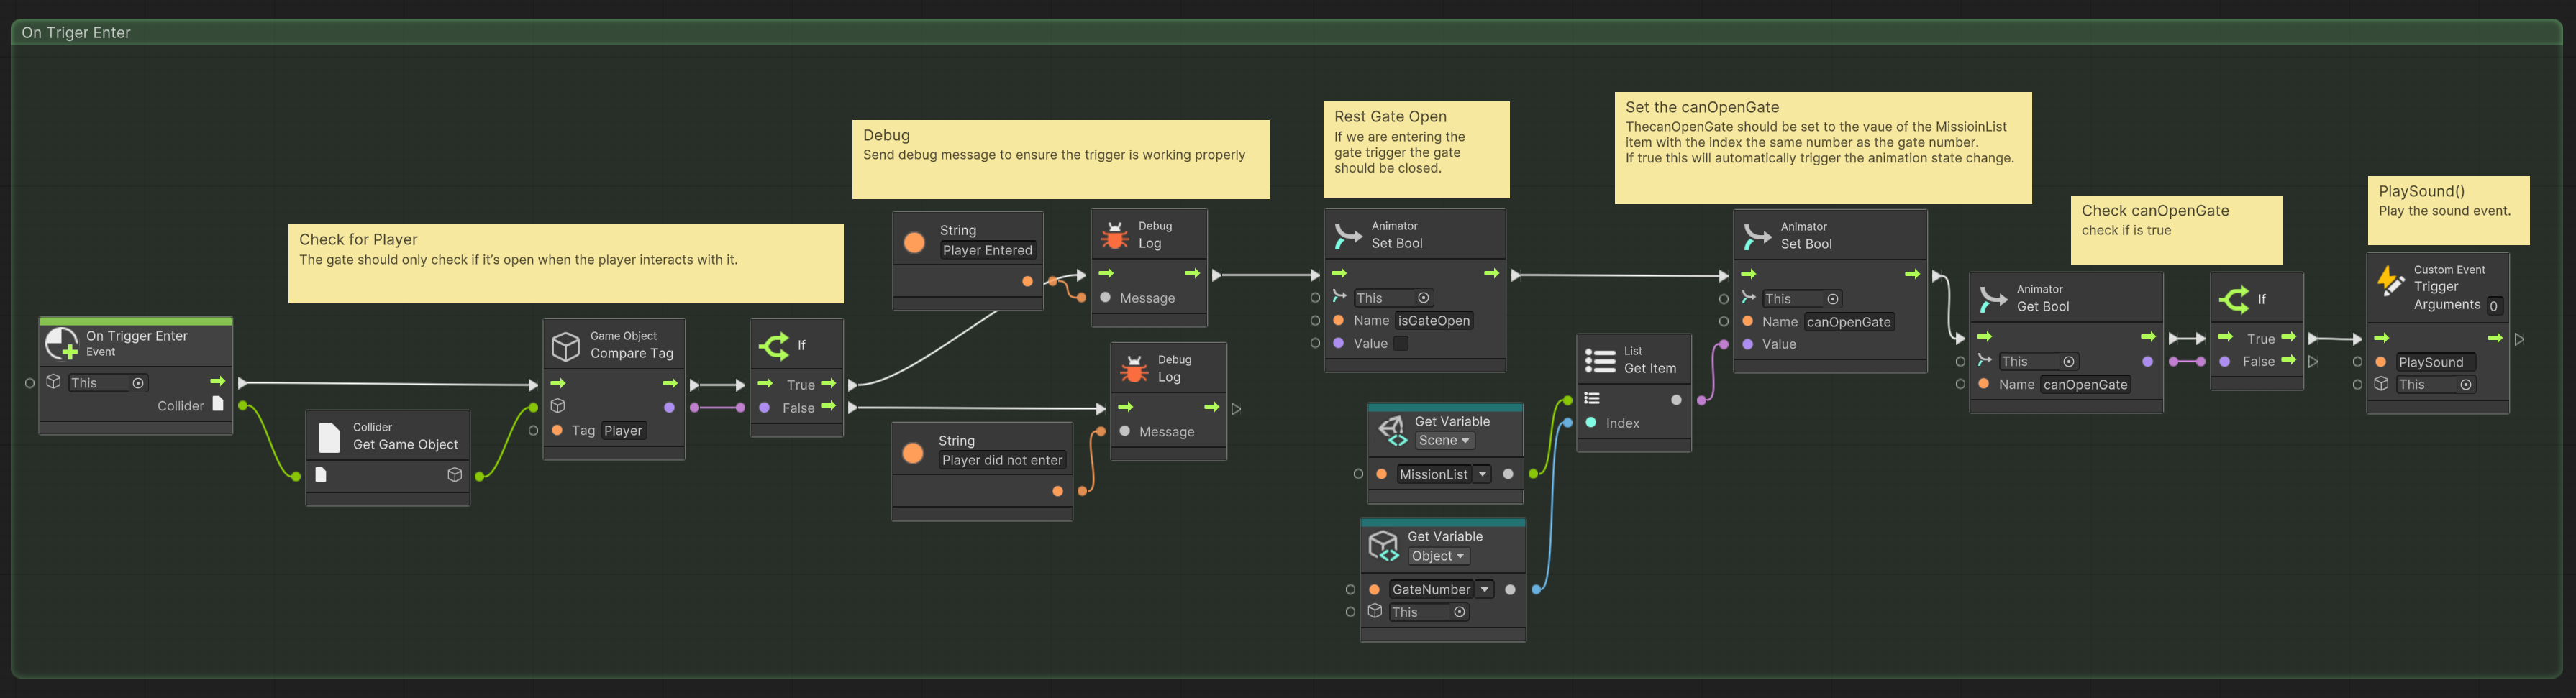
Step 3: Ensuring the Gate is Closed
When the player enters the gate's trigger, the gate should be closed. However, if the gate was previously opened, we need to reset the isGateOpen animator parameter to false to ensure the correct behavior. For more details, refer to the Object Flowchart example.
-
Set the Animator Bool
- In the Graph Editor, right-click and search for
Animator Set Bool. - Set the parameter name to
isGateOpen- Ensure that it is spelt exactly as it appears in the Animator, or it will not work.
- Set the value to false (unchecked).
- In the Graph Editor, right-click and search for
-
Connect the Flow
- Connect the True output of the branching
Debug Logmessage ("Player Entered") to theAnimator Set Boolnode.
- Connect the True output of the branching
Step 4: Link Gate and Mission
Whether a player can open a gate depends on whether the mission associated with that gate has been completed. To associate each gate with its corresponding mission, we will assign a unique number to each gate using an object variable named GateNumber. This number will correspond to the index of the mission in the MissionList, which we set up with the LevelManager. Since list indexes start at zero, the first gate should have an index of 0.
-
Create an Object Variable
- Select the correct Gate object in the scene and open its script graph.
- Open the Blackboard (variable management sidebar).
- Create a new object variable named
GateNumber. - Set its type to int and assign it a default value of
0.
-
Retrieve the Mission Status
- Add a Get Scene Variable node and select
MissionList. - Add a Get Object Variable node and select
GateNumber. - Add a Get List Item node to retrieve the mission's value:
- Connect the list input of
Get List Itemto theMissionListscene variable. - Connect the index input to the
GateNumberobject variable.
- Connect the list input of
- Set the Animator Bool
- In the Graph Editor, right-click and search for
Animator Set Bool. - Set the parameter name to
canGateOpen.- Ensure it is spelled exactly as it appears in the Animator; otherwise, it will not work.
- Set the value to the output of the
Get List Itemnode.- This ensures the gate’s
canGateOpenparameter matches the completion status of the associated mission in theMissionList.
- This ensures the gate’s
- Connect the Flow
- Connect the
Animator Set Boolnode forisGateOpento theAnimator Set Boolnode forcanGateOpen, ensuring the logic executes in order.
- Test the canGateOpen
- Save the graph and close the Script Graph window.
- Enter Play Mode.
- Complete a mission by collecting the required trash bags and delivering them to the trash bin.
- Navigate towards the gate to the next area. If everything is set up correctly the gate should open.
At this point, once the value of canGateOpen is set, the animator controller on the gate object will automatically perform its check. If canGateOpen is true, it will trigger the gate's opening animation. However, we might want additional actions to occur, so we need to explicitly check the value of canGateOpen ourselves.
Step 4: Checking if the Player Can Open the Gate
-
Get the Animator Bool
- In the Graph Editor, right-click and search for
Animator Get Bool.- Set the parameter name to
canGateOpen.
- Set the parameter name to
- Connect the flow of the
Animator Set Boolnode forcanGateOpento theAnimator Get Boolnode.
- In the Graph Editor, right-click and search for
-
Branching (If)
- Add an
If(Branching) node and connect the output from theAnimator Get Boolnode.
- Add an
Step 5: Trigger a Custom Event
For this game we want a sound clip on the gate to play alongside the animation. While we could trigger the sound inside the OnTriggerEnter event, the OnTriggerExit will require the same sound effect. To avoid redundancy, we'll create a custom event to handle the sound, which both trigger events can call.
- If
canGateOpenis True- From the
Ifbranching node’s True output, add aCustom Event Trigger. - Set the name of the event to
PlaySound. - Set the target to
this.
- From the
Since the event is in the same script graph, we can use this (referring to the current game object) as the target, instead of using GlobalEvent like we did previously. The final OnTriggerEvent script for the gate should appear as follows:
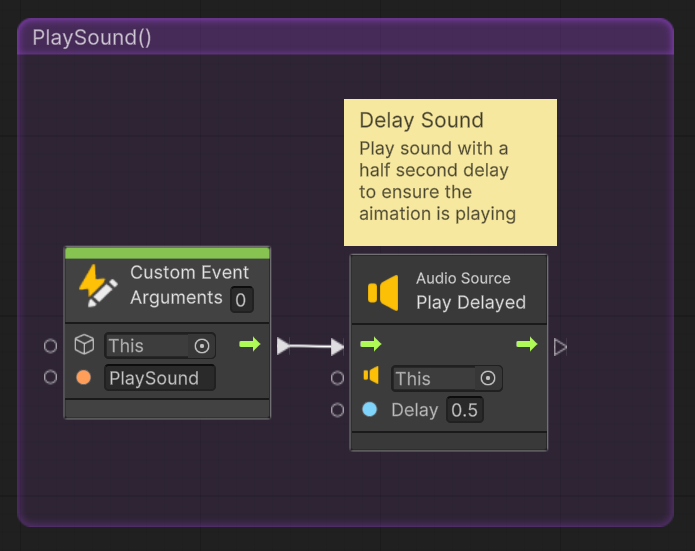
Step 6: Play Delayed
To play the sound clip, we can use the Audio Source Play node, just like we did with the trash bags earlier. However, the sound of the scratching metal for the gate plays a bit faster than the animation. To ensure that the clip aligns properly with the animation, we will use the Play Delayed node.
-
Create a Custom Event
- In the project window double-click the Gate script graph to open it in the script editor.
- Create a new
Custom Eventand name itPlaySound.
-
Play Delayed
- Create a
Audio Source Play Delayednode.- Set the target to this.
- Set the Delay value to 0.5 for a half-second delay.
- Connect the flow from the
Custom Eventto thePlay Delayednode.
- Create a
The image below shows the final PlaySound event in the Gate script graph.
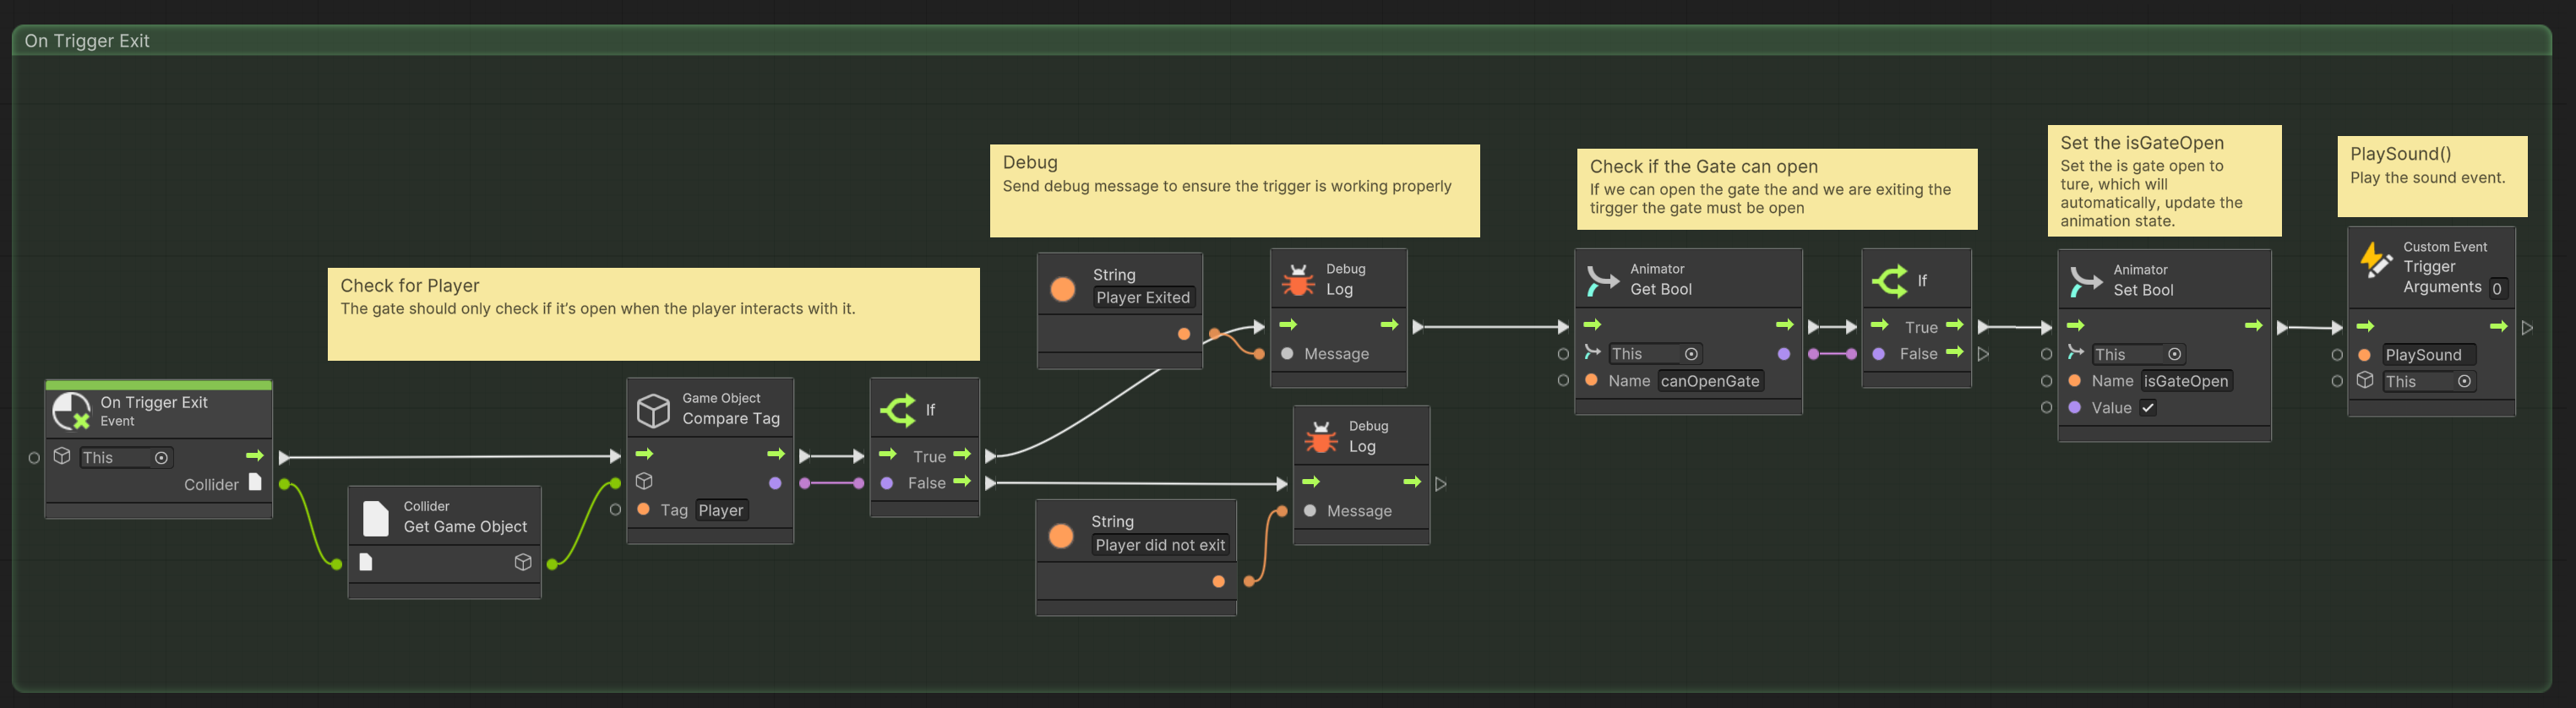
Step 7: OnTriggerExit
Now that our gate can transition to the open animation, we need it to transition back to the closed state when we exit the gate trigger. Since the behavior for this is almost identical to the OnTriggerEnter event, we’ll start by copying it.
-
Copy the OnTriggerEnter Event
- Select all the nodes that make up the
OnTriggerEnterevent. - Right-click and select Copy.
- Move to a blank area of the script graph window and right-click to Paste.
- Delete the
OnTriggerEnternode from the copied event. - Add a
OnTriggerExitnode and set it as the starting node for the copied nodes.
- Select all the nodes that make up the
-
Update Debug Messages
- Update the
Stringnodes for theDebug Logmessages:- Change them from Entered to Exited.
- Update the
While it might seem logical to check isGateOpen, we have never set this variable to true because the instant we do, the gate will close. Instead, we first need to check if the player’s canOpenGate is true.
-
Get Animator Bool
- Delete the
Animator Set BoolforisGateOpen. - Add a new
Animator Get BoolforcanGateOpen. - Connect the flow from the
Debug Logtrue message into theAnimator Get BoolforcanGateOpen.
- Delete the
-
Set Animator Bool
- Delete the following nodes that were copied from
OnTriggerEnter:Get Scene Variablefor MissionListGet Object Variablefor GateNumberGet List ItemAnimator Get Boolfor canOpenGate
- Detach the
ifbranching node and connect theAnimator Get BoolforcanGateOpento it. - Reassign the remaining
Animator Set BooltoisGateOpen.- Set its value to true.
- Flow the
iftrue branch into theAnimator Set BoolforisGateOpen. - Finally, flow the
Animator Set BoolforisGateOpeninto theCustom Trigger Event.
- Delete the following nodes that were copied from
Essentially, we are checking if canOpenGate is true. If so, we set isGateOpen to true, which will trigger the gate's close animation. The final event should look like the following:
📝 Next Mission
Objective:
Now that you have the first section of the Park Clean-Up Game working you will extend it by creating two new mission objectives in the next two sections of the game. These objectives will involve interacting with the environment and require visual scripting to handle their logic. For each new mission, you will need to:
- Design the mission mechanics.
- Create scripts to track mission completion.
- Trigger the mission completion event when the task is finished.
The mission can be based on various activities such as picking up recyclables, returning lost items, or fixing objects in the park. Your goal is to use visual scripting to implement the mission functionality while keeping the object behaviors decoupled and passing only necessary information between components.
Requirements:
-
Mission Design and Objectives
-
Mission Design: Plan out two missions for the next two sections of the park. Think about all the objects the player will need to interact with in order to complete the mission.
-
Sketch a Flowchart: Once the missions are decided, sketch out a quick flowchart outlining the baseline interactions for all objects involved. Consider how the player will interact with each object and how these interactions will lead to mission completion.
-
-
Visual Scripting Logic
-
For both missions, create separate visual scripts to:
- Track any criteria of the mission (e.g. items collected)
- Check if the objective is completed.
- Trigger the
MissionCompletedevent once the mission objective is finished.
-
Reuse the pattern established in previous missions, such as the
HasCollectedAllTrashvariable for checking task completion.- The mission’s script should check whether the conditions for mission completion are met (e.g., all recyclables collected or lost items returned).
-
-
Mission Completion Trigger
- Once the objective is completed, the script should call the
MissionCompletedevent to notify the Level Manager that the mission has been finished. - The next gate should automatically detect the mission's completion and unlock to proceed to the next objective.
- Once the objective is completed, the script should call the
-
Prefab and Graph Variable Organization
- Prefab Behavior: If the behavior needs to be applied to all instances of an object (e.g., recyclables, lost items), place the script graph on the prefab.
- Graph Variables: If the variables are only relevant for an individual object (e.g., specific collectible items or bins), set them as graph variables within the script.
- Object Variables: If the variables are unique to specific instances (e.g., different gates or bins), they should be object variables.
- Scene Variables: If the variables are needed globally across the scene (e.g., tracking mission progress), they should be scene variables.
-
Testing
- Implement
Debug Logmessages as needed to test your scripts - Test both missions to ensure that:
- The player can interact with the environment and complete the objectives (collect recyclables, return lost items).
- The completion of the objective triggers the
MissionCompletedevent and unlocks the next mission. - Ensure that no unnecessary changes are made to the Level Manager or Gate scripts, as these are designed to be dynamic and should not need revision.
- Implement
Submission Instructions:
- Ensure that all changes are committed and pushed to your repository.
- Submit the URL link to your repository.
This assignment builds upon your previous work with visual scripting, focusing on expanding the game's mission logic and ensuring smooth progression between levels. It will help you gain experience in creating decoupled systems that communicate through events and variables, while also maintaining an organized and modular structure.