Custom Movers

In game development, creating unique movement behaviors for different objects is essential for enhancing gameplay and immersion. By extending the capabilities of the MovableObjectBase class, we can create custom mover classes that cater to specific movement patterns required by various game elements. This approach not only leverages the foundational functionality of the base class but also allows for tailored adjustments to speed and direction.
HorizontalMover Class
In our collection game, we can leverage the MovableObjectBase class to create a HorizontalMover that will control the movement of our apple tree, which is meant to move horizontally along the x-axis.
The HorizontalMover will inherit from the MovableObjectBase class and will allow for setting speed and direction in the Unity editor. Since we're moving objects along the x-axis, our direction values should ideally be set to either (1, 0, 0) for movement to the right or (-1, 0, 0) for movement to the left. To ensure these two options are obvious in the editor, we will use an enum called XDirection, which restricts input to these valid states.
It's important to note that while we aim to make it clear that only left and right options are available, the base class's public Direction property will automatically display in the editor. This could potentially cause confusion for level designers. However, since the Awake() method will reset the direction accordingly, it mitigates this issue. To truly avoid any confusion, we would ideally create a custom editor script for this class to properly display the intended options. However, custom editor scripts are beyond the scope of this lesson.
To further safeguard against any issues that might cause the direction to differ from left or right, we will force, set the direction using the SetDirection() method from the base class in the Awake() method. This ensures that the direction is enforced correctly at initialization, applying our movement logic for horizontal movement consistently.
This approach adheres to best practices in code maintainability and prevents unnecessary repetition that would occur if SetDirection() were placed in Update(), which would call the method every frame. As a result, any dependencies related to movement are ready without the overhead of continual checks.
Additionally, calling base.Awake() loads the parent behaviors before setting the direction, ensuring that all necessary initializations from the MovableObjectBase class are completed prior to the specific setup of the HorizontalMover.
using System.Collections;
using System.Collections.Generic;
using UnityEngine;

public class HorizontalMover: MovableObjectBase
{

    // Enum to define movement direction
    private enum XDirection
    {
        Right,
        Left
    }//end XDirection

    //Default value
    [Tooltip("Select the direction of horizontal movement. Set to Left or Right.")]
    [SerializeField] private XDirection _horiziontalDirection = XDirection.Right;

    //Override base Awake() and enforce direction along x-axis
    protected override void Awake()
    {
        base.Awake(); // Ensure base initialization is called

        // Set direction based on the selected moveDirection
        switch (_horiziontalDirection)
        {
            case XDirection.Left:
                SetDirection(Vector3.left);
                break;
            case XDirection.Right:
                SetDirection(Vector3.right);
                break;

        }//end switch

    }//end Awake()
}
While we have the CalculateDirection() method available in the base class, it is not utilized in this implementation. This is because the horizontal movement is straightforward and only requires a fixed direction along the x-axis. The CalculateDirection() method is better suited for more complex movement patterns where direction needs to be dynamically computed based on various factors.
Adding HorizontalMover
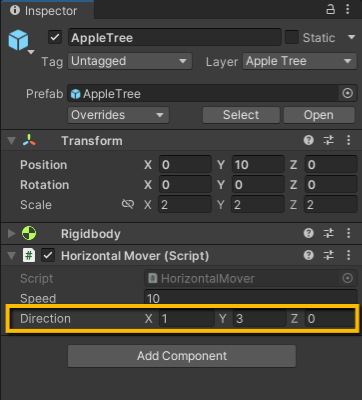
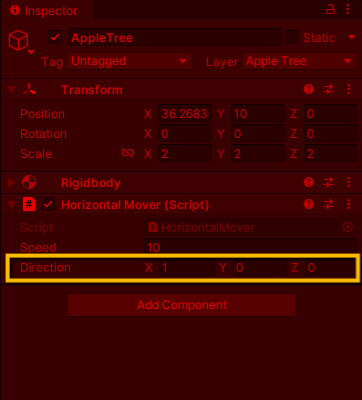
In the Unity Editor, we can add the HorizontalMover component to our Apple Tree prefab, allowing us to adjust the speed to our preference. Although the direction property remains accessible in the Unity Editor and can be set to any value, it will automatically reset to the default direction as soon as we hit play.
| In Editor | In Play Mode |
|---|---|
 |  |
Creating Custom Movers
With the implementation of the HorizontalMover , we've established a solid foundation for custom movement behaviors in our game. This modular approach allows for easy extensions; for instance, creating a VerticalMover is as simple as changing the direction to move either up or down along the y-axis.
Furthermore, the CalculateDirection() method can be utilized to enhance the complexity of movement. By overriding this method, custom movers can implement unique calculations that dictate how the direction is determined, allowing for more dynamic behaviors. For example, you could incorporate logic that adjusts the direction based on game events, player interactions, or environmental factors.
Consider experimenting with various movement patterns by creating your own custom mover classes! Here are a few ideas to inspire you:
-
ZigZagMover: Implement a movement pattern that alternates direction in a zigzag fashion, using sine or cosine functions to create an oscillating motion along the x-axis.
-
CircularMover: Design a mover that travels in a circular path, utilizing trigonometric functions to compute the changing position based on time.
By leveraging the concepts covered in this chapter and the foundational capabilities of the MovableObjectBase class, you can create unique movers tailored to the specific needs of your game. Explore different patterns and behaviors to enhance gameplay and bring your creations to life!